Sometimes a random idea can result in a pleasant surprise. Such was the case with our Canon PowerShot SD950, which we had written off as dead last summer. The camera took a short drop and hit the hard floor of my in-laws boat. After that the camera was only half working, it would come on sometimes but most of the time was dead. A few days later the camera would not even turn on.
Well, for reason's unknown, I decided to put the battery in the camera and turn it on yesterday. And too my surprise, the camera turned on, took photos and video and is working like a charm. This made my day, as I really liked the camera and even with a DSLR the ultra-compact is nice to have available for many situations and can save wear and tear on the SLR.
Just goes to show that sometimes things are not as they might seem.
Blessings,
Jesse
Tuesday, May 28, 2013

Monday, May 27, 2013
Collapsed Skagit River Bridge
There are some things you never expect to see, especially when you live in small town Skagit Valley. A collapsed bridge is definitely high on that list, but for all of us Skagit Valley residents and the 70,000+ cars a day traveling on Interstate 5 a bridge with a quarter of it collapsed and now residing in the cold waters of the river below is the surreal reality.
On Thursday, May 23rd an over-height truck struck the overhead trusses of the I-5 bridge over the Skagit River, causing a section of the bridge to collapse. My wife and I were heading north to look at a house and were on the bridge about an hour an 40 minutes prior to the accident. We were on our way home about a half hour after the incident and saw first hand from the parallel bridge the aftermath and cause of the traffic mess we were in.
On Saturday, I took some time to take some photos from the nearby levee of the scene you never expect to see in person.
The bridge has become something of a local tourist attraction for locals and not so locals alike. Typically during the month April and the annual Tulip Festival we will have people stop and ask gave directions to the Tulip fields, and the other day while on a walk my wife and I had someone stop and ask how to get to the bridge for a visual vantage point.
Thank God this wasn't worse and no one died, hopefully they will get it repaired or replaced in a timely manner as the traffic is going to be a major issue until there is a new (or repaired) bridge.
Blessings,
Jesse
On Thursday, May 23rd an over-height truck struck the overhead trusses of the I-5 bridge over the Skagit River, causing a section of the bridge to collapse. My wife and I were heading north to look at a house and were on the bridge about an hour an 40 minutes prior to the accident. We were on our way home about a half hour after the incident and saw first hand from the parallel bridge the aftermath and cause of the traffic mess we were in.
On Saturday, I took some time to take some photos from the nearby levee of the scene you never expect to see in person.
 |
| Panoramic of the entire bridge |
 |
| Vertical Panoramic of part of the bridge |
 |
| Zoomed in panoramic of the collapsed section |
The bridge has become something of a local tourist attraction for locals and not so locals alike. Typically during the month April and the annual Tulip Festival we will have people stop and ask gave directions to the Tulip fields, and the other day while on a walk my wife and I had someone stop and ask how to get to the bridge for a visual vantage point.
Thank God this wasn't worse and no one died, hopefully they will get it repaired or replaced in a timely manner as the traffic is going to be a major issue until there is a new (or repaired) bridge.
Blessings,
Jesse
Wednesday, May 22, 2013
Removing The Sunny Day Haze
Nothing like a bright sunny day to get you outside, especially come spring time when the daylight hours begin to last longer and the cold chill of winter starts its slow retreat to make way for the long awaited summer warmth.
While a nice break from winter weather, the bright sun poses some definite challenges for photography, with one being the bright hazy and washed out look that ends up in many photos. This can be be fixed with some digital development if the image isn't too washed out. I have had some good luck fixing the haze with The GIMP program and below have the general outline of my steps, though with this particular demo image my results weren't worth much as it was quite hazy.
First here is the original photo, nothing spectacular - just a view from a local observatory that came out hazy and washed out looking:
 |
| Original Photo |
For images that have some unwanted haze, but aren't too far glazed over below are my steps I typically use in The GIMP program that I have had some luck using to eliminate much of the haze and improve the photo:
Optionally, warm the color tones up slightly (as I mentioned in a previous post)
Step 1: Adjust brightness (down 10-30 points or so) and contrast (up 5-10 points or what looks appropriate)
Step 2: Adjust levels down to .95 - .85 from the 1.0 default middle option (again, this varies with the photo and level of haze)
Step 3: Adjust curves in a manner similar to the below screen shot, pulling the lower left curve down slightly and the upper right up slightly - adjusting as needed for the particular image.

Working with a RAW image is where we can really get some great results on images that may appear to be throw aways. Some we will be able to get great shots from and some may only be turned from a discard into merely a decent image.
Using Darktable, follow the below steps as a template to bring out the potential in your hazy sunny day images:
1: Exposure adjustment - boost the black slider slightly (toward the right) and leave the exposure adjustment alone.
2: Local Contrast - boost contrast and detail slightly (to the right)
3: Levels - Adjust the middle bar slightly to the right.
Three quick steps and below is the final result:
 |
| Darktable Adjusted Final |
The more I work with Darktable to develop RAW images, the more I see the advantages to the RAW format. The results are often much better, even if the only adjustments are the base curve and sharpening the program applies upon import and the extra development time is very minimal.
Anyway, there you have it: a good starting point to help bring out some pop to an image otherwise destined for the discard pile. Happy developing!
Blessings,
Jesse
Tuesday, May 21, 2013
2013 Tulip Field Photos
May is coming to a close and the local Tulip festival that concluded at the end of April seems like ancient history. And while many plants are still in bloom, the tulips prefer colder weather and have all either been topped by bulb producers or have lost their petals naturally.
Tulips make fantastic photos every year, and this year I really only had a brief window for photos. With a nine month old, schedules revolve around the little one and my wife and I were just able to make the locals night at one of the local tulip fields toward the end of the evening. It was a cooler and cloudy evening but it was my one shot for tulip photos this year.
More photos next season, stay tuned.
Blessings,
Jesse
Tulips make fantastic photos every year, and this year I really only had a brief window for photos. With a nine month old, schedules revolve around the little one and my wife and I were just able to make the locals night at one of the local tulip fields toward the end of the evening. It was a cooler and cloudy evening but it was my one shot for tulip photos this year.
 |
| Tulip Reflections |
 |
| Pink Tulips and Lady Liberty |
 |
| Tulips and the Barn at Tulip Town |
 |
| Red Tulips at Tulip Town |
More photos next season, stay tuned.
Blessings,
Jesse
Saturday, May 4, 2013
A Quick Adjustment To Improve Your Digital Photos
From my experience, digital cameras are notorious for rendering photos with color temperatures on the colder side - especially if you use auto white balance. This isn't to say that every photo you take with a digital camera will look like it was taken in the coldest winter in the arctic circle, but the image may not look as inviting as it did when taken when a steely gray/blue cast permeates the scene.
This can be addressed with a quick and simple color balance adjustment to warm up the color tones. Using The GIMP program (free, open source and available cross-platform) simply go to the colors menu and then choose color balance. You will be greeted with which ranges to adjust and three adjustment sliders: Cyan/Red, Magenta/Green and Yellow/Blue.
For most images you don't need to do much, a simple +5 on the Cyan/Red scale and a -5 on the Yellow/Blue scale done with the Midtones option selected is just enough to do the trick.

For illustrative purposes I have an old photo taken of my old cat with my first decent digital camera, a Minolta Dimage S304. The first image is the untouched photo from the camera, followed by one done on Midtones only with a +10, 0, -10 on the scales and the last one with a +5, 0, -5 adjustment done all all three range adjustments.
As you can see, it doesn't take much to positively change the final image. And if you are new to digital development, this is a great place to start that will improve many photos all the while not being difficult.
Blessings,
Jesse
This can be addressed with a quick and simple color balance adjustment to warm up the color tones. Using The GIMP program (free, open source and available cross-platform) simply go to the colors menu and then choose color balance. You will be greeted with which ranges to adjust and three adjustment sliders: Cyan/Red, Magenta/Green and Yellow/Blue.
For most images you don't need to do much, a simple +5 on the Cyan/Red scale and a -5 on the Yellow/Blue scale done with the Midtones option selected is just enough to do the trick.

For illustrative purposes I have an old photo taken of my old cat with my first decent digital camera, a Minolta Dimage S304. The first image is the untouched photo from the camera, followed by one done on Midtones only with a +10, 0, -10 on the scales and the last one with a +5, 0, -5 adjustment done all all three range adjustments.
 |
| Original |
 |
| +10, 0, -10 - Midtones Only |
 |
| +5, 0, -5 Shadows, Midtones and Highlights |
As you can see, it doesn't take much to positively change the final image. And if you are new to digital development, this is a great place to start that will improve many photos all the while not being difficult.
Blessings,
Jesse
Monday, April 22, 2013
City At Night - Long Exposures of Playgrounds
City parks, and the playground toys they typically contain, are usually bustling with activity and the laughter of little ones enjoying the out doors. Not so at night, which gave me an idea that the playground equipment might make an interesting long exposure photo, as many long exposure photographs have an entirely different look than a daylight photo - a look that can often have an almost post-apocalyptic feel to it.
The look is not quite what I expected, though the look is still vastly different than daylight hour photos. This project was definitely a fun experiment and one I am very happy with the results and also likely to add to sometime in the future. On this photo excursion, I found that the ambient light makes a huge difference with these types of photos, not only on how long you will need to leave the shutter open, but also on the overall look and feel of the final image - especially in the color tones. The ones that I found worked the best were taken long enough after sunset for any last lingering rays of sunlight to have passed, leaving street lamps and exterior lighting of any surrounding businesses as the only light sources. Below are my favorites from the shoot:
I also took a couple of long exposure shots in my back yard (see long exposure of tulips), and below is one of a not yet leafing tree with stars and clouds visible.
Two take-away tidbits I figured out while taking these pictures: First, 30 seconds feels like an excruciatingly long wait standing in the dark on an empty playground waiting for a shutter to finally close. Second: bring a powerful enough light to aid with focusing if there is not enough ambient light. A small LED light just doesn't have enough range for auto focus to work or allow you to see for manual focus. Also, with these types of shots you will find a good remote shutter release is worth every penny.
Blessings,
Jesse
The look is not quite what I expected, though the look is still vastly different than daylight hour photos. This project was definitely a fun experiment and one I am very happy with the results and also likely to add to sometime in the future. On this photo excursion, I found that the ambient light makes a huge difference with these types of photos, not only on how long you will need to leave the shutter open, but also on the overall look and feel of the final image - especially in the color tones. The ones that I found worked the best were taken long enough after sunset for any last lingering rays of sunlight to have passed, leaving street lamps and exterior lighting of any surrounding businesses as the only light sources. Below are my favorites from the shoot:
 |
| 30 Second Exposure |
 |
| 20 Second Exposure |
 |
| 20 Second Exposure |
I also took a couple of long exposure shots in my back yard (see long exposure of tulips), and below is one of a not yet leafing tree with stars and clouds visible.
 |
| One Minute Exposure |
Two take-away tidbits I figured out while taking these pictures: First, 30 seconds feels like an excruciatingly long wait standing in the dark on an empty playground waiting for a shutter to finally close. Second: bring a powerful enough light to aid with focusing if there is not enough ambient light. A small LED light just doesn't have enough range for auto focus to work or allow you to see for manual focus. Also, with these types of shots you will find a good remote shutter release is worth every penny.
Blessings,
Jesse
Saturday, April 20, 2013
In Camera Black & White vs. Software Conversion
Black and white photography was never something I pursued personally - appreciated yes, but until recently not something I had a personal interest in producing. That all changed after being the adviser for a middle school photography club after the black and white assignment. Participating with the students sparked an interest in Black and White photography for me, and I will do a few conversions here and there through out any given year. I also have some ideas for intentionally setting out to create an image meant to be black and white as opposed to converting some of my collection as an after thought for images that look like they will work well as a monochrome.
Now when we look at modern digital cameras, we will always find a dedicated black and white mode where the camera will do all the monochrome processing. This may make it quick and easy to create black and white photos, but this does come with two big drawbacks if you select this mode to create a black and white photograph. The first being the loss of any color information (unless you are shooting with a DSLR on raw or raw+jpg). This may seem trivial, especially if you are looking to create a black and white work, but when going this route you just may loose an image that would be better had the color information been retained. Number two is a lack of control with the overall final image, you may be able to fine tune a little bit with software but the camera has pretty much set the foundation.
When it comes to software conversion, the big drawback is the added time it will take to do the conversion. While its true that you can have some base presets in most software, these presets would typically be image specific and won't always produce the look you are trying to achieve with other images. It may work as a good baseline, but you will likely need to do some more fine tuning. Really a small trade off for having full creative control over you final product.
So, with that in mind, below are some comparisions of an in camera black and white next to an image converted in software. To set up this shot, I placed my camera on a tripod and set it for a monochrome image on RAW+JPG. This way, I will have the full color information in the RAW file as well as the in camera processed monochrome image as a JPG.
For reference and comparison, 1st we have the color image:

Next, we have the in camera processed image:

Then, a black & white converted with the GIMP program:

And lastly, one converted with Darktable:
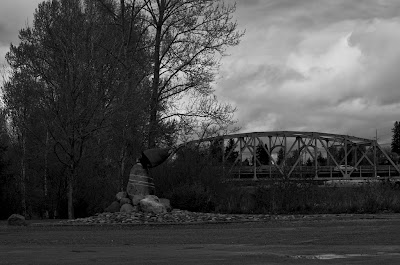
When it comes to the final product, I think you get much better results with the software conversion and that is what I recommend. As a side bonus of having a better finished image and full control over the look, you also still retain your color photograph, giving you the best of both worlds.
Blessings,
Jesse
Now when we look at modern digital cameras, we will always find a dedicated black and white mode where the camera will do all the monochrome processing. This may make it quick and easy to create black and white photos, but this does come with two big drawbacks if you select this mode to create a black and white photograph. The first being the loss of any color information (unless you are shooting with a DSLR on raw or raw+jpg). This may seem trivial, especially if you are looking to create a black and white work, but when going this route you just may loose an image that would be better had the color information been retained. Number two is a lack of control with the overall final image, you may be able to fine tune a little bit with software but the camera has pretty much set the foundation.
When it comes to software conversion, the big drawback is the added time it will take to do the conversion. While its true that you can have some base presets in most software, these presets would typically be image specific and won't always produce the look you are trying to achieve with other images. It may work as a good baseline, but you will likely need to do some more fine tuning. Really a small trade off for having full creative control over you final product.
So, with that in mind, below are some comparisions of an in camera black and white next to an image converted in software. To set up this shot, I placed my camera on a tripod and set it for a monochrome image on RAW+JPG. This way, I will have the full color information in the RAW file as well as the in camera processed monochrome image as a JPG.
For reference and comparison, 1st we have the color image:

Next, we have the in camera processed image:

Then, a black & white converted with the GIMP program:

And lastly, one converted with Darktable:

When it comes to the final product, I think you get much better results with the software conversion and that is what I recommend. As a side bonus of having a better finished image and full control over the look, you also still retain your color photograph, giving you the best of both worlds.
Blessings,
Jesse
Subscribe to:
Posts (Atom)