Thursday, February 27, 2014

I'm A Photographer And My Own Worst Critic

Perhaps it is the perfectionist side of me or the technical nature of my mind, or perhaps it is just something any artistic individual experiences: a critical mind when reviewing ones own work. It can be so easy to pick apart our photographs and dismiss the image (either partially or fully) based on something minor, when many others would look at the photo and think it is a great shot.

Now, I had created a second Flickr account to use for photos set up for this blog. Photos I would put there would typically be set ups used to illustrate a blog post (such as the look at Darktable's profiled denoise option) and probably not be ones I wanted in my main Photostream that I considered my better photos.

Well, I took a photo of a Giant Pacific Octopus taken at the Seattle Aquarium and used it as a visual comparing the final results of a Darktable Developed RAW file next to a camera JPG developed in the GIMP program. I had nit-picked this photo because of the reflections in the glass that I didn't care for (my wife on the other hand thinks this is a cool photo) and dismissed it as not a Flickr Portfolio image. So instead, I chose to use it for the aforementioned RAW/JPG comparison article. For reference, the Darktable edited photo is displayed below:
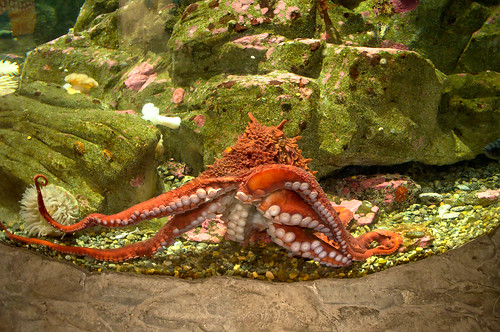
Giant Pacific Octopus - Darktable Edit

Well, fast forward a bit and in a about a month and a half after posting it to Flickr and having it in my blog (the blog post has only a few views), the image above was added as a favorite once and has more views than any of my other photos. Maybe the Creative Commons license I assigned to it has something to do with the views, as other images posted with Creative Commons licenses have gained many more views than some of my favorite work (and the CC licensed photos are just boring comparison photos of toddler toys!). Or perhaps not, I will have no way of really knowing. Either way, I missed the boat there as that could have been plenty of views directed at my "Portfolio Pictures."

So are you your own worst critic too?

Blessings,

Jesse

Monday, February 24, 2014

White Balance and a Photo's Final Look

White balance can have a subtle or even dramatic effect on the overall look and feel of a photograph. With modern digital camera's often all that is needed to improve the look of a photo is a slight adjustment to the color balance or white balance (which was the subject of one of my previous posts).

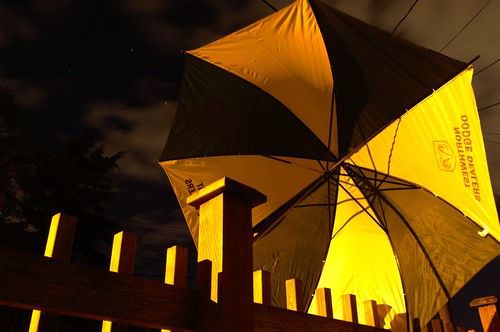
When we are talking about more than a subtle adjustments the difference can be more dramatic and the image takes on a whole different mood and feel. Take the image below, taken for a Digital Photography School assignment (Simple Things: Umbrella). This was a long exposure that has a unique look as a result of the ambient light being a street light (the umbrella itself is white and green).

Umbrella at Night

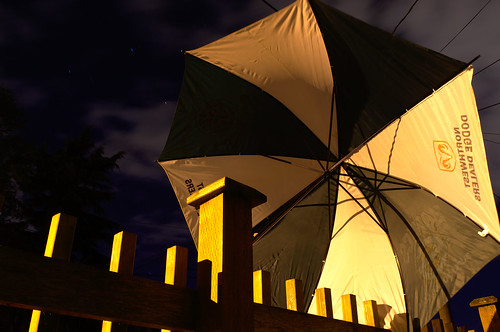
Now we look at the second edit below where the white balance was adjusted below 4000k (where the original was around 5700k). The yellow cast is nearly vanished, the sky a dark blue instead of black and the white in the umbrella looks white.

Umbrella At Night

Just one of the ways an images over all look and feel can be altered with a single change during post processing. Each of the above files were edited from the same RAW file with Darktable.

Blessings,

Jesse

Monday, February 17, 2014

Rabbit Hunting with a Northern Goshawk

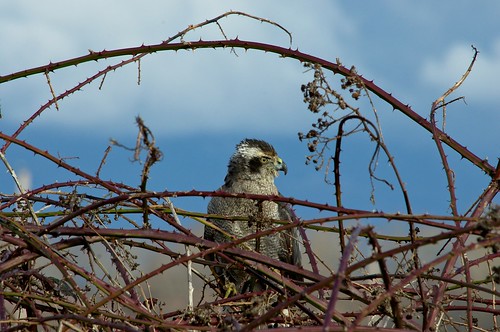
I haven't had any opportunities to photograph any of the local Hawk's as I usually see them perched on light poles or telephone wires while driving (usually on the freeway). That changed recently when I was able to join a friend on a rabbit hunt with his Northern Goshawk. I have always liked the birds and wanted to get some good photos of them as they are beautiful birds far away and even more so up close.

It was a great time and a good opportunity to work on my wild life/avian photography without the worry of only getting one shot of a Hawk in action before watching the bird fly away from the range of my equipment. Armed with my 55-300mm lens I was able to capture some good photos of the Hawk, unfortunately all but one of the shots taken of the bird in flight turned out blurry.

We also didn't have any luck on the rabbit hunt.  The Hawk did take off to chase after some small birds - which was quite cool to see just how fast the bird is - but didn't catch anything this time out.

Northern Goshawk on the Hunt
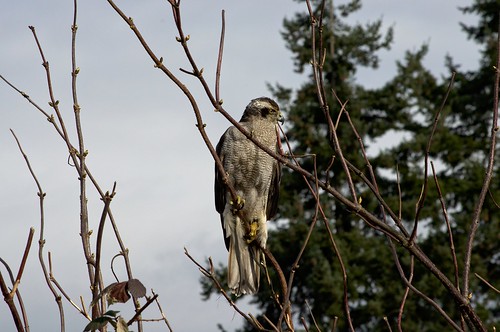
The Northern Goshawk Perched and on the Hunt

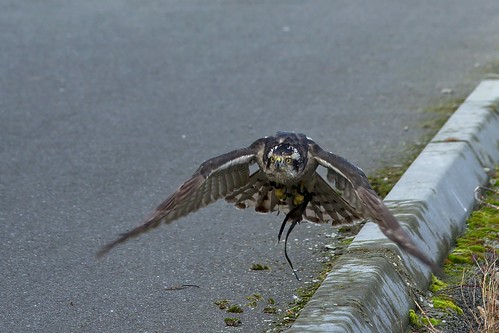
Northern Goshawk Taking Flight
The Northern Goshawk Taking Flight

Northern Goshawk Perched in a Blackberry Bramble
Perched in the Blackberry Brambles

Next time I will have an idea on what to expect, and leave the camera on single servo AF instead of continuous. The focus with continuous-servo didn't seem to be the best when the hawk was sitting still and with how close we were to the bird it was not practical to try and track and focus on him in flight.

Blessings,

Jesse

Tuesday, January 28, 2014

Sailboat Reflections

As much as I like my D5100 and the quality photographs it produces, it's not something I bring with me everywhere a photo opportunity could potentially arise. Such was the scenario Saturday while my family and I were spending some time in Anacortes on a nice sunny winter day. We decided to bring our old compact Canon so we would have a camera and not have to worry about the Nikon.

While walking around by the Marina, I took a couple quick shots of the sailboats sitting in the still, glass smooth water. Below is one of the shots I took.


The reflection is so near perfect that I had viewed this image on the camera's LCD upside down and was thinking to myself that something didn't look right before I realized I was viewing it flipped.

Blessings,

Jesse

Thursday, January 23, 2014

Planning Lunar, Astronomical or Scenic Photos with the Lunar Phase Andoid App

When I was finally able to purchase a DSLR, one of the first photos I wanted to take was one of a full (or nearly full) moon. It was a type of photography that was not doable with my point and shoots and one I wanted to try for myself.

I have on a few occasions taken the time to set up and take some photos of the moon and you can see some of my results in my Shooting the Moon post and again on my post titled Shooting the Daylight Moon. All of my lunar photo sessions have been spur of the moment type scenarios where the conditions are favorable and I grab my gear and go take my photos. Planning a lunar photo shoot is next on my list as I have in mind what I anticipate to be a good location for a full moon rising picture.

Recently I have found a great Android App to assist in the planning of any photographs involving the sun, moon or lack of either: The Lunar Phase app developed by AndScaloid. The app is packed with every stitch of information you could possibly need or want to know about the moon. Starting with the obvious: the moon's phase, we'll also know rising and setting times, its age, illumination and if its ascending or descending (among other information available). You can also choose to display information for the sun (rise, set, civil dawn, civil dusk and more). The rise and set times will come in very handy for planning a sun/moon rise/set photo, as will the calendar to view when the next full moon happens to be. Or on the other hand, you can see when the new moon is if the goal is a night sky photo with no moon visible.

You can also add a bookmark for your location and you will get two arc's drawn on a Google Maps view depicting the path of the moon and sun, complete with graphics of each when they are in view. You will need to get a latitude and longitude coordinate for this feature though, but that is easily attained on Google maps by right clicking on the location and selecting the "What's here?" option. Just make sure you set your time zone in your bookmark or you may be wondering why it always defaults to the time in New York.

All in all this is a great app that I would definitely recommend if your looking for something to help plan out any photos that involve the sun, moon or night sky in anyway.

Blessings,

Jesse

Tuesday, January 14, 2014

Developed RAW vs Developed JPG

When it comes to the RAW vs JPG debate, You don't have to look very hard on-line to find ample amounts of writing espousing the benefits of one format or the other and why you should or shouldn't shoot exclusively with either one. And despite what the title of this post may imply, I will not be debating the merits of either format but rather providing a visual example of one image edited with both formats as a starting point. Both the RAW and JPG file formats have their inherent advantages and disadvantages, but that's another post.

The photo below of a Giant Pacific Octopus was taken on a recent trip to the Seattle Aquarium. The photo was taken on RAW+JPG @ ISO 3200, with the RAW file then developed in Darktable and the JPG file in the GIMP.


Camera JPG


Darktable Edit


Gimp Edit

Of the two developed files, I think the Darktable version is closer to what the scene looked like. But then again, I don't recall exactly as I spent about as much time watching the Octopus as it took to take that photo. Chasing my highly active and very excited 16 month old son left little time to focus on taking anything more than the passing snapshot. On the other hand, in this case I like how the GIMP edited photo turned out a little better, the slight color differences change the mood and feel of the photo. I also could have explored more of the editing options in Darktable to get a similar look, but this was a fairly straight forward, minimally adjusted image for this comparison.

Blessings,

Jesse

Tuesday, January 7, 2014

Darktable's Profiled Noise Reduction

If you are working with JPG files from your camera, you will not need to be too concerned about noise reduction unless you are shooting at a high ISO as the JPG compression algorithm of your camera will apply some form of noise reduction, even if set to off.

RAW files on the other hand will naturally not have any in-camera noise reduction applied and it will be up to you to determine if and how much will be applied during post production. You will likely be able to notice noise even at and ISO as low as 200 when viewing your RAW files at 100%. If not removed, that noise will be present in the exported JPG as well.

When working with Darktable, there has been a profiled noise reduction option since version 1.2. As the name implies, the Profiled Denoise option is based on unique camera model/ISO combinations to optimize the noise reduction while retaining image quality. From working with my RAW files I have found this to be a fantastic option that works very well and it is usually the first edit I apply to any of my images.

For comparison, here is a series of 100% crops taken at ISO 200, 800, 1600, 3200 & 6400 with the Darktable edited photo on top, and the straight off the camera photos on the bottom. The color difference is simply the difference between the standard setting on my Nikon D5100 and the RAW image after Darktable applies it's built in base curve. The Profiled Denoise was set to the default value on all images except for the ISO6400 shot, which was changed to patch size 3, strength 3.


For reference and more in depth comparision, you can see all the full resolution shots at this Flickr Set.

I have found working at ISO400 gives me a good balance between low initial noise, quicker shutter speeds and very little detail loss from the denoise algorithm. Below is a good example of a developed photo taken at ISO 400: My Father-in-law's 1964 Impala SS.


Blessings,

Jesse