After moving up to a DSLR from a compact (especially if you have never spent any time with a DSLR), there may be a bit of information overload with all the options and/or buttons. This shouldn't last long or be very pronounced with Nikon's D5100 as the function buttons are logically and effectively organized. While many DSLR's have function buttons located along the left side, the hinge for the articulating LCD screen eliminates this option - instead placing them along the top and right sections of the rear of the camera.
Like most camera's today you will have a dial to select the shooting mode that includes options starting from full auto, ranging to scenic options like portrait, and making the way to semi-manual modes like shutter priority and then full manual.The live view switch is to the left of the mode dial with the shutter release, video record button close by as well. You'll find the flash function button and a customizable function button near the lens release button by the D5100 tag on the front of the camera body.
The camera body is not too big, and it also does not feel tiny in your hands - I happen to like the size and feel of the camera personally. For shooting options not attached to dedicated buttons the menu is divided up nicely based on function and is easy to find what you are looking for and after a few trips through the menu you will be able to adjust menu functions rather quickly. There is even a handy recent settings menu that will display the options last changed. And as nice as that option is, you can choose to switch the recent settings menu tab to instead display the my menu option where you can select which menu options you want in the list for quick changing. I discovered that one by accident, but glad I did - it is very handy!
I have found for quick shots indoors of family, the portrait preset is a great option to default to. You will most likely get images with flash and ISO 800 on this setting if your lighting is dim, but they will be very evenly exposed with balanced tones and no point and shoot flash white out look. I have not been disappointed with the quality of this combination yet.
For outdoor and scenic photos, I tend to leave the camera on Program after setting my desired base options (such as Large/Fine for the JPG quality setting). Another menu setting (one I have in my custom my menu setting) that is a good one to be familiar with is the Auto ISO setting. When this option is on you set the base ISO and then the maximum ISO/minimum shutter speed combination and the camera will adjust ISO if needed. One word of caution though: if you plan to do some manual exposure settings (like the moon photos I wrote about in October) you will want to make sure the Auto ISO setting is off - or it will interfere with you desired results.
Like most DSLR's today the D5100 has a live view option for using the LCD screen to compose images. This can come in handy in some situations when used in conjunction with the articulating LCD screen to make composing a photo that would otherwise be extremely difficult, if not impossible to compose relying on the view finder only. Other than those situations, I am not a big fan of live view on a DSLR. Also keep in mind that there is a delay in shooting when using live view. When you enter live view the mirror flips up to allow the shutter to open and expose the sensor. When you go to take you shot the mirror flips down, then back up, the camera then takes the photo and after that leaves the mirror up and re-enters the live view session.
Another option I haven't had time to experiment with is the interval timer function, which allows you to set the camera to take photos at a preset and customizable time interval, handy for time lapse photography. After setting the time between photos you will also choose how many photos the camera will take, ranging from 1 to 999. A fully charged battery or an AC Adapter will be a must for this option.
After a couple months of shooting with the D5100 the camera does not disappoint. It also makes a great choice for photo enthusiasts or beginners looking to get into DSLR photography with out completely draining the bank account. While it may lack some of the more advanced features of the D7000, that doesn't take away from the camera in my opinion - it is still a fantastic and plenty capable camera.
Blessings,
Jesse
Wednesday, December 12, 2012
Monday, November 12, 2012
A Diaper Bag Can Double As A Camera Bag
Here is a quick tip for those with babies in diapers: a diaper bag can double as a camera bag in a pinch - or just double up its usefulness for a day if you don't want to bring your regular camera bag for the day's activities.
When my family and I headed out for the annual Pumpkin Pitch event in our community, I didn't want to bring the camera case and have to lug it around the event or leave it in the car and tempt trouble. With the 55-300mm lens on the camera body, I tucked the smaller 18-55mm in a lens pouch and placed it snugly in the diaper bag. I wouldn't end up using the smaller lens, but it was nice knowing it was close by just in case.
The diaper bag was also a inconspicuous camera concealer for the trip home when we stopped to do some grocery shopping. One (very quick!) stop we left the bag in the car with a jacket covering part of it and the longer stop I just slung it over my shoulder and we were able to shop with out worrying about a camera left in the car.
Blessings,
Jesse
Thursday, November 1, 2012
This Year's Pumpkin Carvings
Every year my wife and I will go to a local farm to pick out a few pumpkins to carve. And every year I'll take pictures of our creation. This year we found a couple patterns on-line to trace and as always the third pumpkin would be a freehand carving by myself.
It is fun tradition and the photography part can always pose some unique challenges, especially when the amount of candle light varies greatly between patterns. The camera can also pose a challenge, such as last year when I only had the ability to control exposure compensation with my compact Canon SD950. This year, with the Nikon DSLR, I could control everything if needed.
My favorite of the bunch turned out to be a surprise favorite, as the image did not look that great on the LCD preview. A 6 second exposure at f/5.6 gives this image a warm orange glow all around, an effect I was not going for intentionally - but really like the end result.

Being able to combine a hobby with family traditions is always a plus, and makes the hobby more enjoyable as it doesn't eat away time better spent with family.
Blessings,
Jesse
Thursday, October 11, 2012
Sometimes Simple Photos Become Favorites
Sometimes a quick idea, an impromptu photo, something simple - becomes a favorite photo - or at least a favorite of the day. For me, this was the case recently when my family and I attended the annual Pumpkin Pitch event in our community.
I took this one near where we had parked for the event. As I was looking for something of potential photographic interest, I ended up with this photo of some seeding grass growing up by a strand of barbed wire.
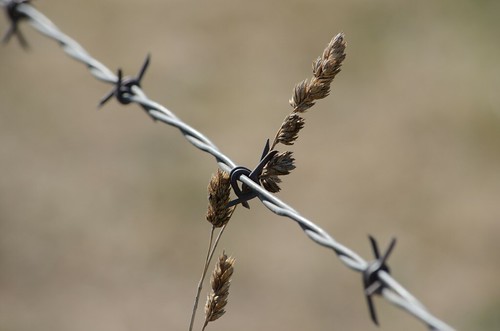
I am a firm believer that you can find a good photo nearly anywhere, so don't be afraid to experiment and point you camera at a seemingly ordinary situation - you just may come out with a new favorite photo.
Blessings,
Jesse
I took this one near where we had parked for the event. As I was looking for something of potential photographic interest, I ended up with this photo of some seeding grass growing up by a strand of barbed wire.
I am a firm believer that you can find a good photo nearly anywhere, so don't be afraid to experiment and point you camera at a seemingly ordinary situation - you just may come out with a new favorite photo.
Blessings,
Jesse
Saturday, October 6, 2012
Shooting the Moon
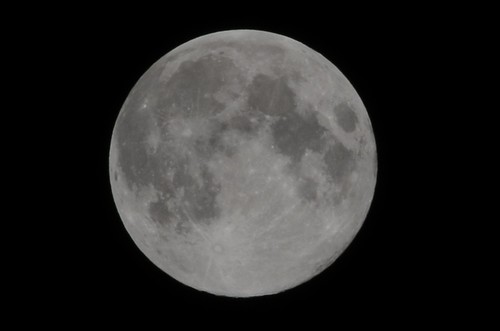
One type of photo I have been aching to take was a shot of the moon. I read a quick tip in Popular Photography on the technical aspects on how to get the shot, and have been waiting for a DSLR to be able to actually take one myself. The tip is simple and produces great results. In manual mode, start with an aperture of f/16 (for a full moon) and set you shutter to be 1/ISO. For a less than full moon, open up the aperture to adjust the exposure.
For my full moon shot shown below, I liked the exposure better at f/18 instead of the suggested f/16. This shot was taken at 1/200 @ f/18, ISO 200.
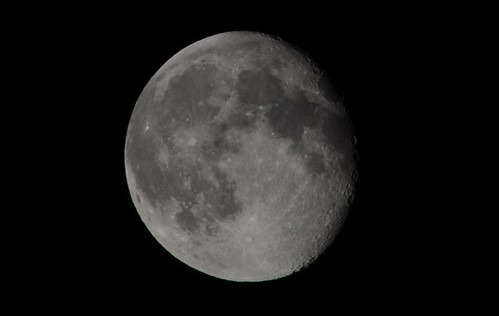
When it came to my first successful moon shot (image number two), taken two nights after the full moon - the best exposure I found was 1/200 @ f/13, ISO 200. What I really like about the less than full moon shot is the detail of the craters that shows up near the shadow line.
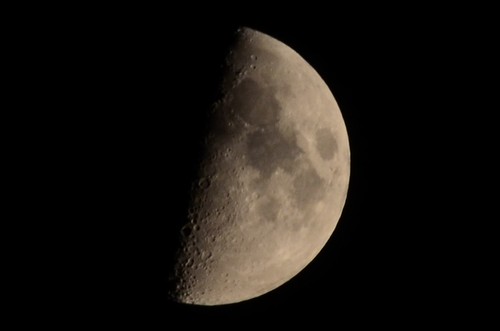
The half moon shot (last image) is where things deviated from the quick tip by quite a bit. Following the magazine tip to the letter may work if you have big f/2.8 zoom lenses, but for most of us and our variable aperture lenses - we will have to get a little more creative. For this shot, my favorite exposure turned out to be 1/10 @ f/11 ISO 400. Of course, we can experiment with shutter speeds and aperture combinations, but this night I wasn't going to spend too much time away from my family since I already got a shot I liked.
When taking photos of the moon, a sturdy tripod is a must. You won't need anything super expensive, but something a little sturdier than a $20 department store special will serve you well. Making use of either a remote shutter release or (as in my case) the camera's self timer is also a must. I found that a ten second self timer was perfect, as it gave the camera time to settle any movement completely after I pressed the shutter.
Full moon (Harvest Moon):
Two nights after the August 31st, full moon:
Half moon (low enough in the sky to have a slight yellow hue):
These photos also mark the start of a new gallery dedicated to night & astronomical photography.
Blessings,
Jesse
For my full moon shot shown below, I liked the exposure better at f/18 instead of the suggested f/16. This shot was taken at 1/200 @ f/18, ISO 200.
When it came to my first successful moon shot (image number two), taken two nights after the full moon - the best exposure I found was 1/200 @ f/13, ISO 200. What I really like about the less than full moon shot is the detail of the craters that shows up near the shadow line.
The half moon shot (last image) is where things deviated from the quick tip by quite a bit. Following the magazine tip to the letter may work if you have big f/2.8 zoom lenses, but for most of us and our variable aperture lenses - we will have to get a little more creative. For this shot, my favorite exposure turned out to be 1/10 @ f/11 ISO 400. Of course, we can experiment with shutter speeds and aperture combinations, but this night I wasn't going to spend too much time away from my family since I already got a shot I liked.
When taking photos of the moon, a sturdy tripod is a must. You won't need anything super expensive, but something a little sturdier than a $20 department store special will serve you well. Making use of either a remote shutter release or (as in my case) the camera's self timer is also a must. I found that a ten second self timer was perfect, as it gave the camera time to settle any movement completely after I pressed the shutter.
Full moon (Harvest Moon):
Two nights after the August 31st, full moon:
Half moon (low enough in the sky to have a slight yellow hue):
These photos also mark the start of a new gallery dedicated to night & astronomical photography.
Blessings,
Jesse
Tuesday, October 2, 2012
Learning SLR photography with a Nikon D5100
After years of wanting to get into more advanced photography with an SLR, I have recently been blessed to be able to purchase one. I was recently able to purchase a Nikon D5100 kit with the 18-55mm & 55-300mm zoom lenses, and will be documenting my learning experience and exploration of more involved photography here.
While today's compacts are very capable camera's that produce very good images , there is still a big difference between an SLR when it comes to quality and especially control. There are just some photos you will not be able to get with the limitations of fixed lens cameras.
My first impressions are very favorable and the D5100 feels very comfortable in your hands and the buttons are well laid out. I have tested the camera out at a local Costco, so there are no real surprises as far as the general camera body goes. The LCD screen is an articulating screen, which eliminates the left side of the body for function buttons, but that isn't a big deal as accessing camera functions is very simple with one button that allows you to cycle through available options with out accessing a menu.
For functions that are only accessed through the menu, you will be able to find them very easily as the entire menu is broken down into sections relative to the type of function and you even have a recent settings menu that displays (and allows you to modify) the menu settings you have changed previously.
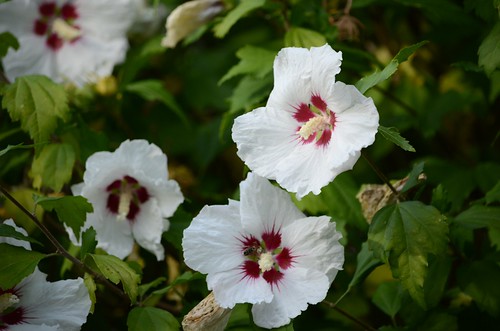
I am excited to share my learning experience, tips and photos I take along the way - starting with a photo of some Hibiscus flowers taken at my in-laws.
Blessings,
Jesse
While today's compacts are very capable camera's that produce very good images , there is still a big difference between an SLR when it comes to quality and especially control. There are just some photos you will not be able to get with the limitations of fixed lens cameras.
My first impressions are very favorable and the D5100 feels very comfortable in your hands and the buttons are well laid out. I have tested the camera out at a local Costco, so there are no real surprises as far as the general camera body goes. The LCD screen is an articulating screen, which eliminates the left side of the body for function buttons, but that isn't a big deal as accessing camera functions is very simple with one button that allows you to cycle through available options with out accessing a menu.
For functions that are only accessed through the menu, you will be able to find them very easily as the entire menu is broken down into sections relative to the type of function and you even have a recent settings menu that displays (and allows you to modify) the menu settings you have changed previously.
I am excited to share my learning experience, tips and photos I take along the way - starting with a photo of some Hibiscus flowers taken at my in-laws.
Blessings,
Jesse
Friday, September 7, 2012
First impressions of Canon's Rebel XS
Canon's Rebel XS was released in 2008, so why even write about it now in 2012? Simply because it is still a capable camera, and not everyone has the interest or budget to buy a brand new DSLR. If you are looking for a Canon on the secondary market, a Rebel XS is definitely worth a look.
I recently had an opportunity to take a few photos with my brother's Canon Rebel XS while he was up in town to visit when my son was born. The Rebel was very pleasant to use, fits nicely in the hand and has the photo quality you would expect from a Canon DSLR. Additionally, I was pleasantly surprised with the presence of a depth of field preview button - something not always found on an entry level body.
Below is a photo taken with the Rebel and Canon's 55-250mm IS lens.
Blessings,
Jesse
Tuesday, July 10, 2012
Capturing Fast Moving Objects With an Ultra-Compact Point & Shoot
Today's Ultra-Compact Point & Shoot camera's pack fantastic imaging into playing card sized packages that are easily taken anywhere, but many lack any manual controls. And while many situations an average photographer may encounter using an Ultra Compact may not call for any creative control, you may find yourself in a situation you may want to be able to have some better control over your camera`s functions .
My Canon PowerShot SD950 does not allow a shutter speed selection. While on a family trip to Ocean Shores over the weekend, I was trying to get some pictures of my brother in law's dog jumping into the canal chasing a tennis ball. For the most part the camera was selecting a shutter speed of 1/160, which may be fine if not for trying to capture a flying dog and getting more than a golden brown blur in the middle of the frame.
So what to do? One way to get around this lack of control is with some creative manipulation of the camera's light meter and utilizing the Auto Exposure Lock feature to get the faster shutter speed. To do this, find different lighting points around you to focus on. Once you find an appropriate shutter speed, lock the exposure and recompose. Also experiment with the exposure compensation feature, as that can effect the camera's choice in shutter/aperture combination.
Using this technique I was able to get a shutter speed of 1/640 to capture this shot of super dog chasing the ball into the water, complete with recently splashed down tennis ball, wet fur rain drops and glassy water reflection.

Blessings,
Jesse
Tuesday, July 3, 2012
Happy 4th of July!
This year sure has flown by as the 4th is here already, wow! For some 4th of July fun I have a couple of fireworks pictures taken with my old Minolta digital camera. Hopefully for next year's fireworks I will have a digital SLR for some serious photos.
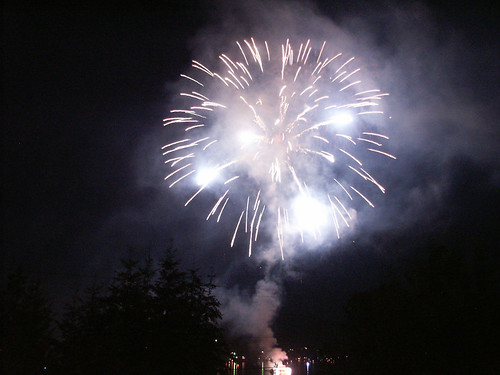
The above photo was taken at a local lake (Big Lake) during the professional show that is put on every year on the 3rd.
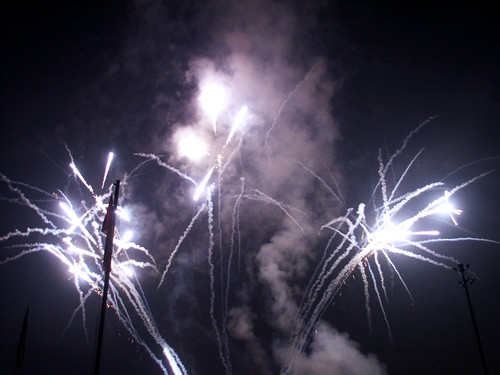
This photo was taken at Evergreen Speedway in Monroe during the 4th of July Extreme Night, complete with demolition derby.
However you celebrate (or don't celebrate if you are not in the U.S.) I hope you have a safe and memorable Holiday!
Blessings,
Jesse
The above photo was taken at a local lake (Big Lake) during the professional show that is put on every year on the 3rd.
This photo was taken at Evergreen Speedway in Monroe during the 4th of July Extreme Night, complete with demolition derby.
However you celebrate (or don't celebrate if you are not in the U.S.) I hope you have a safe and memorable Holiday!
Blessings,
Jesse
Wednesday, June 13, 2012
Deception Pass Bridge in Black and White
Last Sunday my bride and I, along with some other family members, went on an hour tour with Deception Pass Tours. We had purchased the tour on Groupon sometime last year and were finally able to redeem the tour last weekend. The tour takes you from Cornet Bay, under the bridge, around Deception Island and then eventually back to Cornet Bay. We all had a wonderful time and it was really awesome to see the bridge from underneath. I have driven over the bridge and seen the surrounding area from the beaches and roads numerous times, but this was the first time I have seen it from on the water - something everyone from this area should take advantage of. On the tour we also saw a bald eagle, several harbor seals and even caught a brief glimpse of a harbor porpoise or two.
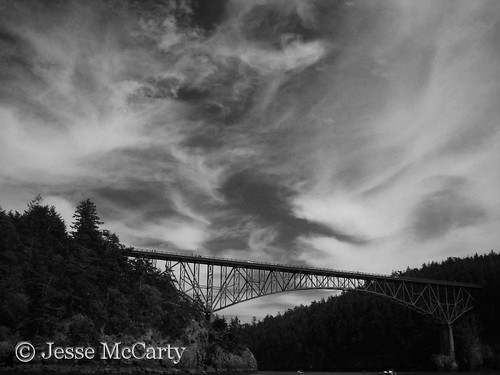
My compact camera was not the ideal camera for the trip to really capture the wildlife, but I was able to capture the shot of the bridge above. I converted the image to black and white with the open source and freely available GIMP.
Blessings,
Jesse
My compact camera was not the ideal camera for the trip to really capture the wildlife, but I was able to capture the shot of the bridge above. I converted the image to black and white with the open source and freely available GIMP.
Blessings,
Jesse
Monday, June 4, 2012
Resynthesizer samples from GIMP 2.8
As I mentioned in my last post, I had some working samples of the resynthesizer plugin available for the GIMP. The photo was taken in Ocean Shores and should make for a good example of the types of photos that work best to use the resynthesizer plugin to remove specific elements from an image.
First up is the unaltered photo, complete with old copyright text leftover from my full on standalone site days.

Next we have four separate elements cloned out using the resynthesizer plugin: the car, kite, gull and copyright text. The text and kite were simple removals by selecting them with the rectangle select tool and running the plugin. When it comes to the car and gull, each were masked out prior to running the resynthesizer. With my experiments to date, I have found that between 25 and 75 seems to be the magic radius range that produces the best results.

And for fun, since this photo in either form does not comply with some basic composition guidelines, I created a second image with the gull moved.

Hope you have enjoyed seeing what can be accomplished with a little work using open source software.
Blessings,
Jesse
Saturday, June 2, 2012
Photoshop's Content Aware & Gimp's Resynthesizer Plugin
I still remember when Adobe's Photoshop CS5 was introduced with the then new Content Aware Fill feature and how incredible the new technology looked. Each demo video quickly and seamlessly removed "unwanted" items from a photo effortlessly - a true wow moment for sure. This feature has also previously existed in the form of the resynthesizer plugin for the GIMP image editor prior to the release of Adobe's Photoshop CS5.
Within the last couple of months I have had a chance to play with both, thanks to Adobe opening up Photoshop CS6 to a public beta. Keep in mind that while the demo video's for this technology make it look borderline unbelievable, it does have limits to what it can accomplish - as I found out during my testing of both the Adobe product and the open source version.
Now, lets look at my case study and do some comparing. Picture the following scenario: A student club photo with several rows of students lined up in front of a stage curtain. One of these students did not belong to the club and the question was posed if he could be removed from said photograph. Thankfully for this test, the offending student was at the end of one of the rows and I thought it just might be possible with the resynthesizer plugin for the GIMP (my work copy of CS3 lacks the content aware technology). So, with the resynthesizer plug-in setup on my machine (then with GIMP 2.6) I set out and masked out the photo bomber (as one student dubbed those sneaking into photos they do not belong in) and ran the resynthesizer. After some tweaking, the photo bomber was removed, though not a perfectly seamless removal as we saw in Adobe demo videos. When viewed at full size, you can definitey tell something was done to the photo, though this was less evident on a copy printed on a laser printer.
This scenario did not play out as well using Adobe's Content Aware offerings. The algorithms cloned hair from an adjacent student and did not produce as clean of a clone that I was able to attain with the open source alternative. This is not to say with some tweaking a more acceptable result could not be attained, simply that for this experiment the winner is the free and open source application.
This was definitely not the ideal test for either program, but an interesting case study. Both work much better at patterns that would not be as tight as a stage curtain and need more of the pattern surrounding all sides of the subject to be removed.
If you are interested in experimenting with the GIMP version, you can find the download information for the resynthesizer plug-in here. If you are using GIMP on a Windows system don't fret over the old version that is available, I did my above testing on Windows XP and it works great. You may need to download an updated Heal Selection script from the Gimp Plugin registry and then use the Heal Selection option found under the Filter - Enhance menu. The updated .scm file fixed an error I encountered with the resynthesizer plugin. After I had downloaded and copied this file over I was able to do all the testing referenced above.
I will have a sample photo up I have been working on using the resynthesizer with Gimp 2.8 to follow up soon, stay tuned!
Blessings,
Jesse
Monday, May 21, 2012
Topped Tulips
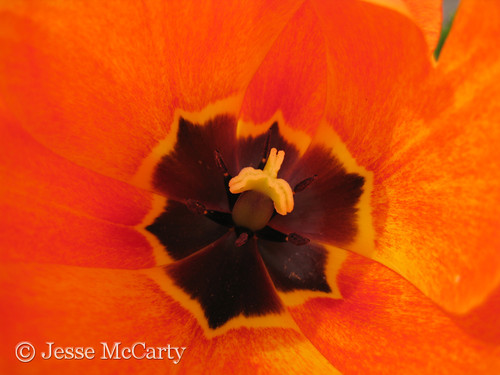
May is drawing to a close and the annual Skagit Valley Tulip Festival is fading into a distant memory (along with the extra traffic it brings) for the season. The tulips have also been long since topped, which the bulb growers do each year to preserve the bulbs, meaning the beautiful tulip vistas are void of the vibrant multicolored patterns and are limited to fields of green.
Tonight's images are two tulip photos taken in the process of a local field being topped. The first is a photo of some topped tulips and the second a close up of one that has not been topped yet.
Don't forget to take time to stop and smell the flowers, since you don't know how long they will be there!
Blessings,
Jesse
Wednesday, May 2, 2012
The New Nikon D3200
Announced on April 19th and now beginning to show up in online stores, the Nikon D3200 is the latest entry level DSLR to be released by Nikon. Like the D3100 before it, the D3200 represents quite a nice improvement over the last generation model it replaces (at least at first look on the specification sheet).
The D3200 packs a 24.2MP sensor into an entry level body and also adds wireless shutter release capabilities. I will admit to being partially susceptible to the more is better when it comes to a sensor's megapixel count, but more so the wireless remote option makes this an even more compelling option - the one I am most excited to see on an entry level body. With the wireless remote option, the last thing I would like to see offered on an entry level body would be exposure bracketing. Perhaps the D3200's replacement will offer this option and perhaps not, as too many features would likely pull people away from buying the more expensive mid-level option.
I am sure the 24 megapixel sensor is going to bring an endless supply of banter about what someone really needs as far as resolution or it will lead to more noise or it is ridiculous for some other reason, but everyone has an opinion. And like it or not, pixel count is easily marketed and will sell cameras. Plus, for those of us who do not have the luxury of affording full frame body's or high end APS-C body's a 24 megapixel entry level brings many benefits. I for one am looking forward to seeing how it performs in the typical magazine tests, especially in the noise department and how it stacks up against my current wish list favorite: Nikon's D5100.
What also is of great interest with this release is what it will mean for the mid-level and advanced consumer level DSLR offerings from Nikon. Traditionally the mid-level and advanced models share a higher resolution sensor than the entry level and the biggest difference between the top two is the feature set. Will the replacements for the D7000 and D5100 sport 30+ megapixel sensors and keep the traditional pattern? Or will we see a D7100 and D5200 sport the same 24.2 megapixel sensor and the main differences in the lineup will be reduced to the features and possibly the noise control? Time will tell...
One thing is for sure, it is hard to imaging a better time than now to be into digital photography, with the quality of equipment available for all skill levels at attainable prices.
Blessings,
Jesse
Monday, April 23, 2012
GoSkagit Tulip Contest - My Entry
April marks the annual Skagit Valley Tulip Festival and during this year's Festival our local newspaper & publishing company is hosting a Tulip photo contest. I saw the add in one of the publications and have been eyeing the lighting and looking for my opportunity to grab a good photo to take a shot at the contest. My submission has been approved and is one of 30 photos up for voting, which started Sunday the 22nd and ends on the following Sunday the 29th.
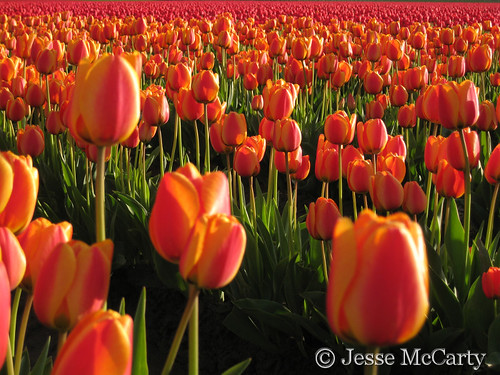
What really makes this photo for me is definitely the lighting. The late evening sun created a nice glimmer on the edges of the flowers. You can see the contest page at http://goskagit.upickem.net/engine/Welcome.aspx?contestid=56023 and see all the entries and even vote if you are so inclined.
Blessings,
Jesse
Wednesday, April 18, 2012
A Spring Sunset
As I mentioned in my post from Monday night I love taking photos of a good sunset. There is just something about the nightly paintings God gives us that never gets old, either simply them observing or actively photographing the vibrant colors. Tonight's photo is the result of my drop everything and go take some photos impulse alluded to in Monday's post.
The sunset intensified while I was near the tulip fields and I ended up getting this shot, which was my favorite of the bunch. As I mentioned previously, I had a little off road adventure that occurred after my brain took a vacation from simple math, as in soft dirt + rain = MUD! That little excursion may have contributed to missing the shot I had initially set out to capture, but all was not lost as I came home with this photo that I am quite happy with. Another adventure in photography that led to a memorable photo with a memory and story to look back on with a laugh.
Blessings,
Jesse
Monday, April 16, 2012
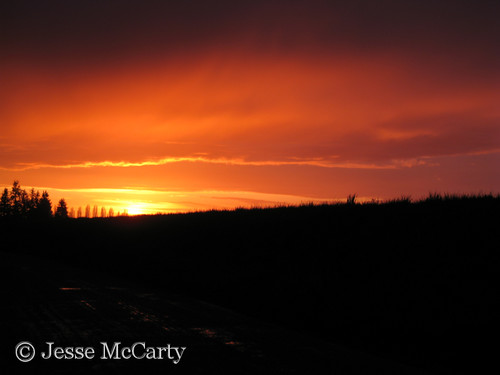
Nothing Like a Fiery Sunset
I will never tire of a brilliant sunset, either of just sitting (or standing for that matter) and enjoying the color show God gives us at night or of taking photos of a good sunset. Sunsets have always been one of my favorite photography subjects and they always will, though I do find myself much pickier in what I find to be a great sunset photo anymore. Some of my old favorites seem less than inspiring as I look back at them. But I guess that comes with the territory of being an artist and your own worst critic (when it comes to my photos at least).
In fact, as I was typing this post up I saw what looked to be a great looking sunset and dropped the computer, got in the car and drove down the road to the vantage point I was thinking would work well for an impromptu photograph. Well, this was one of those good idea, bad idea moments... Good idea: Drop everything and take a photo of a nice sunset. Bad idea: Leave wearing only slippers and park off the road in a soft muddy spot next to a tulip field... Well, as you can imagine I totally got stuck in my front wheel drive Saturn (thank the Lord someone helped push me out!) and caked my slippers in mud at the same time. Oops!! That will be a fun story for my wife when she returns from her ladies group tonight!!
So anyway, back to sunsets... I recently finished uploading a group of some of my still favorite sunset photos (with one sunrise in there) to my Flickr account for your enjoyment. These photos make up a new set dedicated to Sunsets and Sunrises. The one photo featured in tonight's blog post was taken on New Year's Day at Fort Casey in Washington State. This sunset was one of the most brilliant I had ever seen and only continued to get better and better the longer we were there. My brother-in-law and I spent about 20-30 minutes taking photos that night and the colors continued to intensify with each passing minute - it truly was a spectacular sight we were blessed with that night. With the featured photo below the small portion of concrete in the very bottom of the frame looks very similar to the water seen in the bulk of the photo, something I think really adds to the photo.
Next time I'll be wearing real shoes or avoiding the mud!
Blessings,
Jesse
Wednesday, April 4, 2012
Meerkats at the Zoo
Not only is a local zoo a fun filled and educational afternoon, but they make great places for photography. The trip also makes a wonderful date, as was the case for my wife and I on our trip in the summer of 2010. One of my favorite exhibits they had that trip was the meerkats. These guys were fun to watch with no shortage of curiosity. They also seemed to be standing guard as if on sentry duty, all but the one on the right who is finding something quite interesting straight above them.
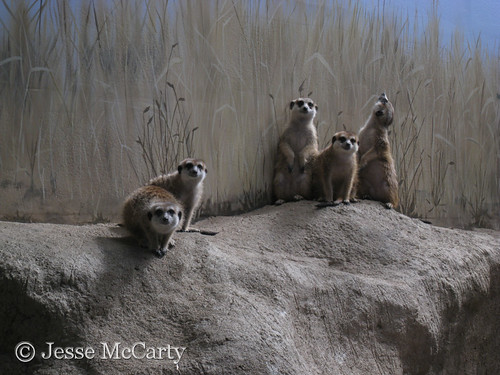
Along with the meerkat photo, I also uploaded other shots and a new Flickr set for animals and wildlife. I also added a waterfall photo from Multnomah Falls to the Nature and Scenic set.
If you are looking for something to do for an afternoon, a casual and enjoyable day in the sun, consider a trip to the zoo. It will likely be a memorable several hours and you'll be able to come out with some great photos as well.
Blessings,
Jesse
Monday, April 2, 2012
Sigma 70-200mm f/2.8 Discontinued
Recently Sigma discontinued their non-optically stabilized 70-200mm f/2.8 lens. When exactly it was discontinued isn't clear, as it was available for purchase last fall and I haven't found anywhere online an actual date it was discontinued. This lens offered a relatively inexpensive option for a constant aperture in the 70-200 zoom range, selling for around $500 less than the Optically Stabilized version of the same lens from Sigma and selling for a much steeper discount over a stabilized Canon or Nikon lens of similar specifications.
I wonder if this is the start of a trend as image stabilization has grown from being a great option to being virtually expected on any lens or camera as even the basic kit lenses all include image stabilization. It will be interesting to see if other lens manufactures follow suite, and I expect to some extent that they will. Currently Tamron appears to be the only 3rd party lens manufacture with a 70-200 f/2.8 that is not optically stabilized, though a recent patent posted on Photo Rumors shows what looks to be an updated 70-200 that includes Tamron's Vibration Compensation technology. And while Canon still sells a non IS version of their 70-200, it is predictable more expensive than not only the discontinued Sigma lens, but more expensive than Sigma's stabilized version as well.
While the lens is discontinued and not available at most camera retailers, you can still find it on Amazon and the secondary market. I have had some hands on with this lens, using it on a Canon Rebel T2i for the Yearbook & Photography club I advise at a local middle school. This is our sports lens used heavily at indoor school sporting events and the students have produced some fantastic shots with it. Even with the 2.8 aperture ISO 3200 is still the typical ISO used for fast enough shutter speeds in the poor lighting of a middle school gym.
Now we wait and see how many more non stabilized lenses are added to the discontinued list, and maybe of more interest - how many new lenses are made with out stabilization?
Wednesday, March 28, 2012
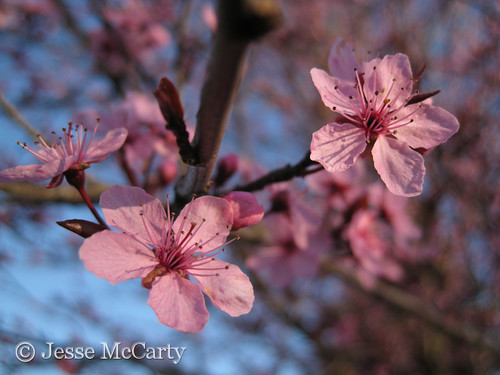
More Signs of Spring
More and more flowers are blooming every day and our tulips are poking through and ready to bloom anytime now. The signs of spring are more and more prevalent every week and I am so excited for the spring weather and the summer to follow. The other night we had some great lighting conditions for photographing the pink blossoms on the tree outside our house and I did not let the opportunity pass me by! The tree blossoms are the first photo below, and the second shot of a pansy we have in a planter on our porch. I really like how the lighting was for the first image and the angle of pansy is not what you might typically see.

I also uploaded some of my other favorite flower photos, many taken from the Roozengaarde tulip fields in the Skagit Valley. The flower images make up a new set on my Flickr page with 13 photos to start. Any feedback is always appreciated!
Blessings,
Jesse
I also uploaded some of my other favorite flower photos, many taken from the Roozengaarde tulip fields in the Skagit Valley. The flower images make up a new set on my Flickr page with 13 photos to start. Any feedback is always appreciated!
Blessings,
Jesse
Wednesday, March 21, 2012
Its spring time, now for the spring weather...
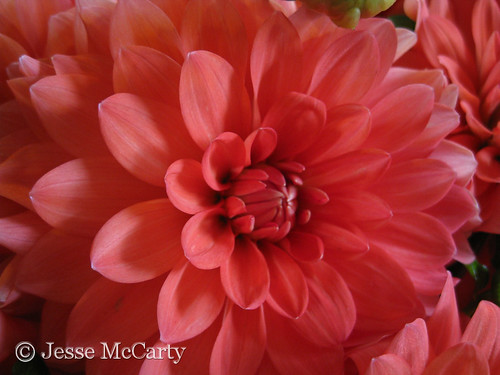
Ah spring time. Warmer weather new beginnings, an overall exciting time of year. We have sprung ahead and its now light out after 7pm in the valley and I am totally in spring time mode - just waiting for the weather to warm up! Yesterday was the first day of spring and this morning we were greeted with temps in the low 30's and a dusting of snow that froze solid during the night! While the weather is cold, the signs of spring are more and more prominent every day with more plants in bloom. So, with hopes for a warm spring and summer, here is a nice close up of a dahlia taken in the summer time to start off spring.
Blessings,
Jesse
Blessings,
Jesse
Wednesday, March 14, 2012
Another New Gallery Uploaded
With the excitement of the new adventure for my blog using free tools comes new motivation to get my current photos uploaded and then get rolling on new photos and posts.
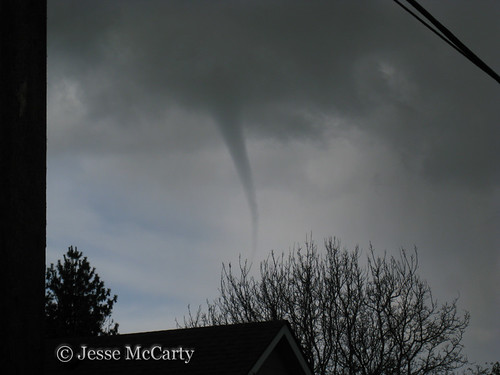
Tonight I got a start with uploading some of my Nature & Scenic photos and have two photos from that set for your enjoyment tonight. The first taken on the beach at Camano Island State Park, and the other a funnel cloud in Western Washington, a very rare sight.
Feel free to check out the rest of the set and leave me feedback.
Blessings,
Jesse
Monday, March 12, 2012
New Gallery Uploaded
Continuing on with my transition over to free tools for my photography site, I have uploaded seven Panoramic photographs to my Flickr account. Panoramic photos continue to be one of my favorites to take and I really like how the ones showcased turned out.
The image for tonight's post was taken in Eastern Washington with some menacing storm clouds looming on the horizon.

Be sure to check out the rest of the panoramic shots and never hesitate to leave me some feedback.
Blessings,
Jesse
The image for tonight's post was taken in Eastern Washington with some menacing storm clouds looming on the horizon.
Be sure to check out the rest of the panoramic shots and never hesitate to leave me some feedback.
Blessings,
Jesse
Sunday, March 11, 2012
New Home
Spring is synonymous with new beginnings and that is definitely the case with my photography blog. While I am keeping the domain name I have had for the last couple years (www.jandmweb.net), finances do not allow for a renewal of the hosting package and I am now starting anew with this blogger blog and using Flickr to host my photo galleries and the images I will use in the blog.
I am excited for the new change as it will likely mean I will be easier to find and in many ways make it easier and less time consuming to update the blog, all the while being slightly less stressful by not having to deal with extra outgo for the hosted solution. I am currently working on getting images uploaded to my Flickr account, but have a start with a Black and White gallery and some images uploaded about three years ago before I had my own site.
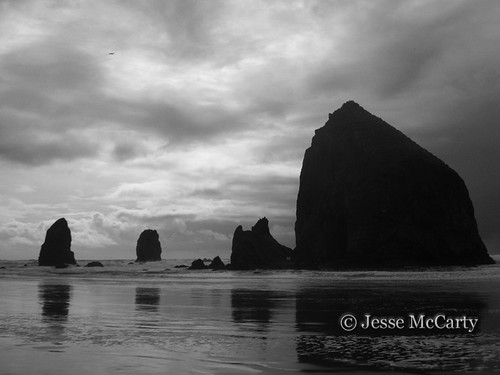
Here is to the new adventure for the blog and one of the black and white images in the Flickr Gallery.
Blessings,
Jesse
I am excited for the new change as it will likely mean I will be easier to find and in many ways make it easier and less time consuming to update the blog, all the while being slightly less stressful by not having to deal with extra outgo for the hosted solution. I am currently working on getting images uploaded to my Flickr account, but have a start with a Black and White gallery and some images uploaded about three years ago before I had my own site.
Here is to the new adventure for the blog and one of the black and white images in the Flickr Gallery.
Blessings,
Jesse
Subscribe to:
Comments (Atom)