Wednesday, October 30, 2013

2013 Pumpkin Cavings

Its that time of year again, fall is in full force and its time to carve pumpkins! As we do every year, we pick out three pumpkins from a local pumpkin patch and with the Pumpkin Master's templates create our yearly jack-o'-lantern's.

This year had the added ambiance of a string of festive orange lights hanging on the porch to add to the orange glow of the candlelight, while the street light casts a shadow from the shrub growing in front of the porch.

3 seconds @ f/8 ISO 200

One of these years I will find a better backdrop for the hollowed out glowing pumpkins - maybe next year!

Blessings,

Jesse

Thursday, October 24, 2013

Fun Photos With Legos

Lego's not only make entertaining toys to build nearly anything your imagination can conjure, but they also make fun photography subjects. Most notably they make excellent macro subjects, giving ample opportunities to experiment with depth of field. Of course the miniature nature of the Lego figures and structures mean they can be repositioned and experimented with in a very short period of time, leaving plenty of different scenes to be captured with a camera with out an undue time investment.

The three photos below are from my archives, taken at my aunt and uncle's house during a birthday party with one of my cousins. First we have a pair of photos with R2-D2 caught in the middle of a tense situation (and maybe joining in a little too!) and after R2's troubles comes a Lego race ready to begin.

Caught in the Middle

Maybe he can hold his own

Ready... Set...

These were are taken with my older Canon SD950, I would definitely like a chance to experiment with some Lego photos using a Macro Lens on my D5100.

Blessings,

Jesse

Wednesday, October 16, 2013

Finding the Shutter Count on a DSLR

Many DSLR's (if not all) don't have any options (that I know of) to simply show the actual shutter actuations of the shutter mechanism. Sure you can make a ball park estimate based on the file number of each image (provided you have it set on continuous numbering). But this doesn't take into account use of Live view which will add actuations to the shutter, but not change the file name until you take a photo.

If you have a Flickr account, you can easily see the actual shutter count on any given image you have uploaded to your account, provided your uploaded image did not have the EXIF data removed.  To see the shutter actuations, simply view the EXIF data on any given image and scroll down around 3/4 of the way to the bottom and look for Shutter Count in the long list of information provided.

Using this trick, I can see that one of my images has a file name of DSC_6009 and the actual number of shutter actuations read 6134. So as you can see, using movie mode (which requires live view) and any other live view use comes with a price of additional wear and tear on the shutter mechanism.

Blessings,

Jesse

Tuesday, October 15, 2013

1964 Chevy Impala SS

This is a photo that brings back memories. Though I have never had an Impala, or other classic for that matter, I have owned two Trans Ams and a base model Firebird. And during the time I owned these cars I took plenty of photos of them, and other similar cars during outings with my car club buddies. So on a recent weekend trip to my in-laws for a wedding I got a chance to take some photos of my father-in-law's '64 Impala SS.

1964 Impala SS
1964 Chevy Impala SS

I only took seven shots in a quick impromptu photo shoot in the afternoon. Having the car parked in the grass with the sun filtering through the trees looked like ideal light for a good photo. The photo above is my favorite of the bunch, the others were either very similar or had the house in the background.

Blessings,

Jesse

Monday, October 14, 2013

Review of Generic Batteries After 3 Years of Use

Generic batteries can look like an considerable bargains when compared to the name brand varieties. But is this a case where you get what you pay for, or does the bargain bin provide an outstanding value in this situation? How does a $5-$10 generic battery compare to a $40-$50 brand name after steady use and are you paying for the name or does the branded battery justify the price? Read on and make the decision.

When we purchased our compact Canon camera, I knew I had to have at least one extra battery so as to always be prepared. Wanting to save money and not shell out at least another $40 for a Canon brand battery I went on the Internet hunt and came across www.bestbatt.com. They sell generic replacements at a significant discount over the name brand and we were able to to purchase two replacement batteries for $25 and some change with shipping. After 3+ years of use there is now a noticeable difference between the Canon that came with the camera and the two for $25 bargain bin batteries. The Canon still functions like it did from day one without any  appearance of getting less pictures per charge, even while using the LCD screen 100% of the time and mixing in video recordings.

The generic batteries on the other hand, show a noticeable difference in performance. One of these batteries is virtually useless now as it no longer gets through a full two hour charge cycle with the canon charger - getting the full charge green light in half an hour or just a few minutes. While the charger thinks it is full, the camera says otherwise. With a fresh charge I am greeted with "Change the Battery Pack" on my LCD screen when attempting to use the camera for taking photos. For some reason, I can view all the photos I want with playback - but as soon as I switch to camera mode, the black screen 'change the battery pack' message is back. I haven't tried this battery for several months after it started doing this, so who knows it may have just needed a long rest - but I am guessing it is done.

The other generic has faired better and is still usable, but it is one that we do not like to depend on anymore and get a little nervous if it is in the camera and we don't want to miss a shot. This battery runs out of juice noticeably quicker than the Canon branded battery does and we mainly use it sparingly, typically while we charge the Canon battery. While three years of use out of two batteries for $25 isn't bad, the original Canon battery is still dependable and strong.

Long a proponent of generics in nearly every case, my experience with generic batteries for my small Canon camera has changed my mind for camera batteries. When we purchased our Nikon D5100 I was sure to purchase a Nikon brand spare battery for it, and I haven't been disappointed with the Nikon battery and don't worry about missing a shot due to a questionable battery.

Blessings,

Jesse

Saturday, October 12, 2013

The Faces of Facebook

A new app has been making the news rounds lately, showing profile pictures for every Facebook profile. The Faces of Facebook as it is named, shows the photos when zoomed in and different colored pixels when zoomed out, below is a screen shot.


The zoomed out photo looks like nothing more than digital noise and I think aptly sums up the whole Facebook nonsense: Digital noise. An much like digital noise in a photograph detracts from the photo, the noise of Facebook distracts and detracts from life with no real value.

While on the subject, check out the following links to Non Sequitur comics that speak to the subject: Imaginary friend's and Pre-Internet Social Networking. I think both make great points personnaly.

My last thought on the subject for this post is a challenge to anyone with a Facebook account: take a four week unannounced break, a full on total blackout. Log out of the service on all web browsers you use, mobile apps etc... and change any email settings (or even create an email filter to bypass your in-box altogether) so you get as little email as possible from Facebook. And during that time see how many of your Facebook "Friends" make any effort to contact or communicate with you in any meaningful, personal or intentional way (and asking why you haven't been on Facebook doesn't count). And if the break goes well, consider continuing it from four weeks to four months, then move to four quarters, then four years. You just might discover life in a whole new light again.

Blessings,

Jesse

Friday, October 11, 2013

Sometimes Its Nice Not Having a Camera

At first not having a camera with you being a good thing might seem like an odd thought on a photography site/blog, but bear with me for a moment and you might see my perspective on the idea. I still really enjoy taking pictures, and many times when I do not have a camera on me I find myself looking at a view, local wildlife or a brilliant sunset and think to myself how great of a picture that particular moment in time would make. I had this this as a first thought during a round of golf with some friends but a couple days later I had a new thought and a new perspective on the situation...

On a nice June Monday while some friends and I were enjoying a nice round of golf at Avalon Golf Club, a deer wandered out of the woods and meandered across the grass probably no more than 40 yards in front of us while we were on the tee box. As mentioned earlier, my first thought was that I wish I had my camera, as the scene would have been nice photo op had I had a camera at the ready. After a couple days, I realized how much of a blessing it can be to not have a camera on hand. Instead of worrying about composition, amount of zoom and exposure levels, I was able to just take in the moment and watch the young buck make his way past us on that sunny June day.

Many times a sunset, mountain landscape or a walk graced by the local wildlife can be much more appreciated when viewed with out the distractions of a viewfinder or LCD screen. So I would encourage you, not to give up on your camera and photography, but not to be chained to it either. Take a moment and enjoy part of God's creation free of distractions and you might find the moment can be more enjoyable when it is just experienced as it happens.

Blessings,

Jesse

Thursday, October 10, 2013

Converting an Image to Black and White with the GIMP

Some photos may not come out the way we anticipated, the weather may not cooperate when you are traveling or have the time to take photographs which could end up leaving a final image that is simply missing something. Or perhaps the scene just doesn't seem as interesting upon final review as it may have seemed when framing the photo in the viewfinder or LCD screen. And sometimes, a scene just lends itself to be more appealing as a monochrome image.

The image below is one from my collection that wasn't anything very eye catching as a color photo, but after a black and white conversion is vastly improved. This photo was taken in Seattle several years back on a trip meeting up with my brother.  A simple tutorial on using The GIMP program to convert photos to black and white follows the images.

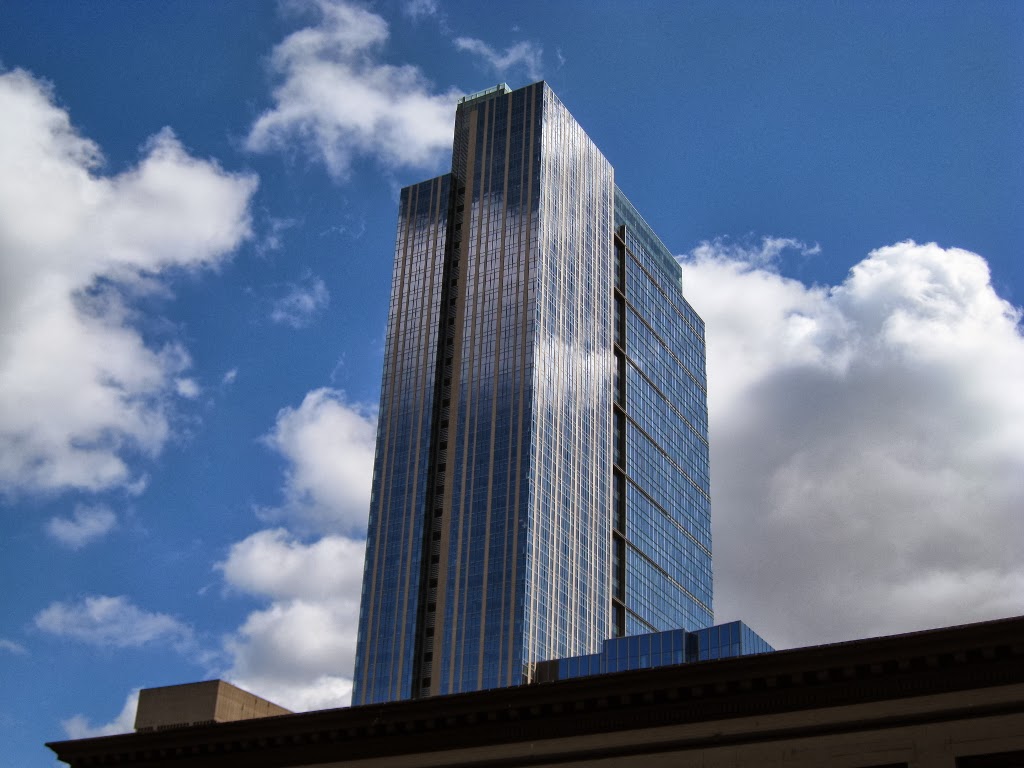
Original Color Image

Seattle Skyscraper in Black and White
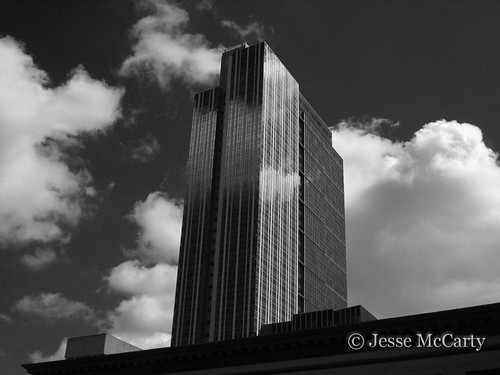
Black and White Version

Converting a photo to black and white with the GIMP program is a simple task that takes a little bit of experimenting with for the best results. The following is a simple path to follow to convert your images.

Step 1: Open the channel mixer, located under the color menu - components - channel mixer.

Step 2: Check the preview and monochrome check boxes. You can also resize the channel mixer window to get a larger sized preview image.

Step 3: Adjust the sliders (red will be defaulted to 100) to get your base settings close to optimal, we will add an extra adjustment after the channel mixer step to fine tune the look. I have found that on many images having the blue channel fairly close to the inverse of the green channel (say, 40 green -50 blue and/or similar combinations) yields pleasing results. When you are happy with the preview box, click OK. You can even save the slider settings for later use with the save option/button. Being able to save the black and white settings is a useful tool. To make things quicker I will typically size the image down before starting, get my channel mixer settings the way I want and then save them so I can apply them to the full sized image - this is a handy trick to boost performance if you find the channel mixer slower to respond.

Step 4:  To fine tune our conversion after editing with the channel mixer we are going to duplicate the background layer and change the mode to multiply (to darken the image slightly) and lower the opacity so that we are just darkening the image slightly. You could of course, leave the opacity at 100% if the extra darkness works for the image. If you need to lighten the image slightly we can change the mode to screen and drop the opacity as needed.

Step 5:  Export your image to JPG (or preferred format) for printing or web use and you are done. When doing edits like this I like to save a copy of the image in the native GIMP format (.xcf) so I have a working copy with all my extra layers if I need to revisit or tweak the image at a later time.

The black and white skyscraper image I have printed and hanging up in my office, this is so far my favorite black and white image I have made.

Blessings,

Jesse

Wednesday, October 9, 2013

Wedding Rings & Fall Leaves

Taken a couple of years ago, this photo was inspired by some photos from our wedding, I had an idea to take our wedding rings and set them up on some leaves that were in the fall color change process, similar to the flower photograph from our wedding when the rings were new and clean (as opposed to their not as shiny state in this photo). This was a quick and easy shot to setup with pleasant results, taken with my older Canon PowerShot SD950.

Wedding Rings & Fall Leaves

Next time I decide to set up a shot like this, I will do it after having our rings cleaned.

Blessings,

Jesse