Forgive me Father for I have sinned... I have spent many a night with my thoughts wandering through a maze of equipment, hyper focused on thoughts of acquiring a shiny new camera coupled with equally shiny and vastly more expensive lenses.
Instead of sleeping, my mind would fixate on a 70-200mm f/2.8 zoom, envisioning the weight of the lens in my hand and seeing the beautiful photos I would take with the lens zoomed to 200mm @ f/2.8. The mind may then drift to dreaming up scenarios in which a 105mm f/2.8 Macro lens would come in handy. Time would tick by and instead of my unconscious mind rendering random dreams that would only leave a vague impression in the morning, my still very conscious mind would be rendering dreams of self centered spending on my hobby of choice.
But it wouldn't stop there... A simple trip to Costco turns into a derailment of intended purpose as my eyes are drawn to the camera display with new models beckoning my eager curiosity to come hither and explore. Enticed to pick up the display model, to feel the balance and ergonomics in my palms. Compelled to trace the contours of the textured plastic and feel the subtle resistance of the dial as it rotates and clicks into place for each available shooting mode. And then, to press the soft rubber eye piece to my eyebrow: peering through the viewfinder at the uninspiring landscape of a shopping warehouse. And now, with the focus set it would be time to depress the shutter release and hear the symphony of a mechanical shutter and the nuances of how the sound differs from the familiar actuation of my trusty D5100. As if that was not enough, I would repeat the whole process with nearly every shiny new model on the display line: how does the D5200 sound? Or the D3200? And does the shutter of the new Canon T5i still have that familiar high pitch sound possessed by many of its predecessors?
I confess, I am a gear junkie: I like to know what's new, what's available and especially whats exciting in the world of digital photography - even if I am unable to afford it (either now or ever). I am also realistic in what my budget allows and will never put my hobby (especially spending on that hobby) above my family in importance.
For me, being a gear junkie mainly entails a drive to know whats out there and how I should expect it to perform should I ever be blessed to purchase it. This can come in handy for making recommendations, or can even lead to conversation pieces that could alert a fellow enthusiast to a previously unknown option. Either way, inquisitive minds want to know and learn which is a nature that is rarely satisfied.
Unlike some, my fascination with newly available technology doesn't mean the currently owned gear gets relegated to a dusty shelf while new gear is acquired to the peril of the Visa bill. No, the current gear is used as much as possible while I learn and grow in my photographic abilities - but a man can still dream about available possibilities should the budget change to favor a future purchase. And when that time comes, you can bet I'll be informed and ready for it.
Blessings,
Jesse
Friday, December 20, 2013
Saturday, December 14, 2013
Tamron`s Recently Announced 150-600mm - I Would Like This Lens!
When I first read about Tamron's new 150-600mm lens my gear junkie radar went crazy and I was instantly intrigued and wanted to know more, and of course see sample photos. I also instantly wanted it (provided it was a decent lens and not prohibitively expensive). The lens looks to replace their 200-500mm lens and should make a great "budget" super telephoto for all of us with out unlimited amounts of expendable money laying around - it is also set to be shipping mid January in the new year.
The rumored price of $1,069 is especially amazing considering there is no super telephoto zoom lens near 600mm from Canon or Nikon and the offerings they do have: such as Nikon's 80-400mm, 200-400mm f/4 or Canon's 100-400mm are much more for less range (significantly more for the Nikon's). And to top that off, if you want to get 600mm lens from them you will be spending enough to buy a decent car for the 600mm f/4 offerings.
Of course being on a budget, even the rumored price is likely out of my attainable level for who knows how long, but I would still love to try out this lens - I just might have to give LensRentals.com or BorrowLenses.com a shot when I have some extra cash, some time to play and some 600mm subject material. I know this lens would have come in quite handy on our whale watching trip for sure, though I would definitely want to invest in a monopod for a long reach lens like this.
This sure looks like a winner to me, and it will definitely be interesting to see how it competes with Sigma's existing 150-500mm and what we might see come out of Sigma once this lens has had some time on the market.
Blessings,
Jesse
Wednesday, November 20, 2013
An Essential DSLR Accessory
If you are looking to upgrade to a DSLR or have recently purchased one, there is one accessory you will definitely want in your camera bag: A remote shutter release. Be it wired, or wireless - you will find a remote shutter release immensely useful.
Moving to a DSLR from a point and shoot brings with it additional learning opportunities and technical differences. One of them being a big increase is weight (especially with larger zoom lenses) and lens design which can be more sensitive to camera movement than a point and shoot would be in similar conditions.
Whatever the case, there will come a time when it will be advantageous and in your best interest (and your final result's best interest) to trigger the shutter remotely. I have a Promaster cable release for my D5100 and find it indispensable. Everything from working in a light tent for product photography, to shooting the moon and Lightning Photography - the cable release (or even a wireless release) makes tripod work much smoother and eliminates the possibility of camera shake.
A definite must have DSLR accessory for sure.
Blessings,
Jesse
Friday, November 15, 2013
Feeding the Gulls
A Pacific Northwest beach will never be short of Seagulls. Love 'em or not, they are a fixture on many a beach and they can make for some fun photos, and even challenging ones.
One thing is for sure though, if you feed one you will get an ear full and many sets of hopeful eyes waiting for any little morsel that might come their way. In this first photo, I like how the closest gull appears to be posing, while each of the other birds are nearly perfectly aligned and staring us down hoping for a snack.
Getting the in flight shot was not the easiest shot to get while being fairly close to the birds and sporting an Ultra Compact camera. Of course, most scenarios involving fast moving and unpredictable animals are not the easiest with more limiting gear - but they are still fun to take and satisfying when they turn out well for sure.
Blessings,
Jesse
One thing is for sure though, if you feed one you will get an ear full and many sets of hopeful eyes waiting for any little morsel that might come their way. In this first photo, I like how the closest gull appears to be posing, while each of the other birds are nearly perfectly aligned and staring us down hoping for a snack.
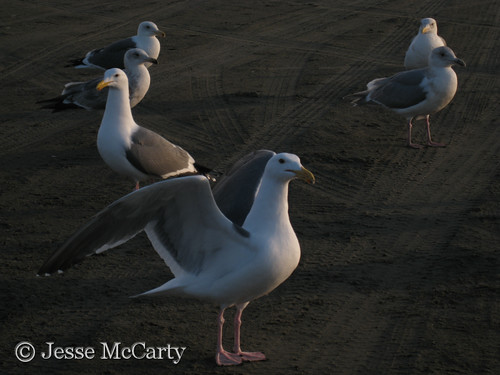 |
| Whatcha got for me? |
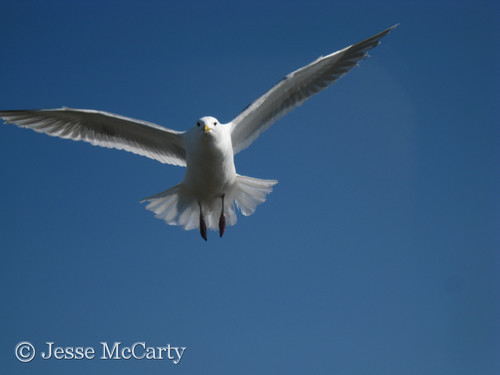 |
| Seagull in flight |
Blessings,
Jesse
Tuesday, November 12, 2013
Picking The Right Lens For The Occasion
If you are like myself and countless other photography enthusiasts, your budget likely only allows (or allowed) for a consumer DSLR and the kit lens(es) contained in the bundle. Most of those bundled sets include an 18-55mm and a telephoto in the 55--200+ range. Having the two different zoom ranges will necessitate making a choice when setting out for a photo session, that is if your plans include only bringing the camera and the single attached lens. If you are not going to bring the other lens to swap on site, you'll want to have the right one for the scenes you will be seeing and the photographs you will be able to take.
Such is the situation I ran into a while back when taking a quick trip to a local park. Stroller in the SUV, my baby boy and I would head off to our destination on the other end of town for a little walk. Not wanting to bring the entire camera bag, or deal with swapping lenses on a short trip, I had put my 55-300mm lens on the camera expecting and hoping for a chance to see some local wildlife to photograph. What I ended up with was no wildlife around and some interesting clouds and opportunities for wider angle scenic photos. But alas, my 18-55mm was safe at home in the camera bag and any local wildlife was a no show.
In a situation like this, I can definitely see the appeal of lenses such as the 18-200mm or Tamron's 18-270mm. But on the flip side, limiting yourself to one lens that doesn't cover such a broad range can help you focus your photography and be forced to be creative to get a memorable photo in the given situation.
Blessings,
Jesse
Friday, November 8, 2013
Old Photograph, New Perspective
It can be very interesting on how things in life change, or rather how our perceptions about a particular object or concept can change as we move forward in life.
The same goes for our perceptions about a given photograph, or the subject matter of that particular photograph. For illustration, the below photo was one I took in 2001 on a trip to Ketchikan, Alaska. I took the photo because the advertised prices for gasoline were the highest I had ever seen at this point in my life. Now I look at this picture and wonder if gas will ever be that cheap again.

On the image quality front, the image quality of the Polaroid digital camera I used seemed to be acceptable at that time (at least for the price of the camera). Now low end camera's in phones produce higher quality results than that particular camera did.
Likewise, when I upgraded to a 3.2 megapixel Minolta digital camera the image quality blew away the cheap 1.X MP Polaroid. And again, the upgrade to an ultra-compact Canon SD950 and then to a Nikon D5100 - the older camera just didn't look so amazing any more.
Blessings,
Jesse
Wednesday, October 30, 2013
2013 Pumpkin Cavings
Its that time of year again, fall is in full force and its time to carve pumpkins! As we do every year, we pick out three pumpkins from a local pumpkin patch and with the Pumpkin Master's templates create our yearly jack-o'-lantern's.
This year had the added ambiance of a string of festive orange lights hanging on the porch to add to the orange glow of the candlelight, while the street light casts a shadow from the shrub growing in front of the porch.
One of these years I will find a better backdrop for the hollowed out glowing pumpkins - maybe next year!
Blessings,
Jesse
This year had the added ambiance of a string of festive orange lights hanging on the porch to add to the orange glow of the candlelight, while the street light casts a shadow from the shrub growing in front of the porch.
 |
| 3 seconds @ f/8 ISO 200 |
One of these years I will find a better backdrop for the hollowed out glowing pumpkins - maybe next year!
Blessings,
Jesse
Thursday, October 24, 2013
Fun Photos With Legos
Lego's not only make entertaining toys to build nearly anything your imagination can conjure, but they also make fun photography subjects. Most notably they make excellent macro subjects, giving ample opportunities to experiment with depth of field. Of course the miniature nature of the Lego figures and structures mean they can be repositioned and experimented with in a very short period of time, leaving plenty of different scenes to be captured with a camera with out an undue time investment.
The three photos below are from my archives, taken at my aunt and uncle's house during a birthday party with one of my cousins. First we have a pair of photos with R2-D2 caught in the middle of a tense situation (and maybe joining in a little too!) and after R2's troubles comes a Lego race ready to begin.
These were are taken with my older Canon SD950, I would definitely like a chance to experiment with some Lego photos using a Macro Lens on my D5100.
Blessings,
Jesse
The three photos below are from my archives, taken at my aunt and uncle's house during a birthday party with one of my cousins. First we have a pair of photos with R2-D2 caught in the middle of a tense situation (and maybe joining in a little too!) and after R2's troubles comes a Lego race ready to begin.
 |
| Caught in the Middle |
 |
| Maybe he can hold his own |
 |
| Ready... Set... |
These were are taken with my older Canon SD950, I would definitely like a chance to experiment with some Lego photos using a Macro Lens on my D5100.
Blessings,
Jesse
Wednesday, October 16, 2013
Finding the Shutter Count on a DSLR
Many DSLR's (if not all) don't have any options (that I know of) to simply show the actual shutter actuations of the shutter mechanism. Sure you can make a ball park estimate based on the file number of each image (provided you have it set on continuous numbering). But this doesn't take into account use of Live view which will add actuations to the shutter, but not change the file name until you take a photo.
If you have a Flickr account, you can easily see the actual shutter count on any given image you have uploaded to your account, provided your uploaded image did not have the EXIF data removed. To see the shutter actuations, simply view the EXIF data on any given image and scroll down around 3/4 of the way to the bottom and look for Shutter Count in the long list of information provided.
Using this trick, I can see that one of my images has a file name of DSC_6009 and the actual number of shutter actuations read 6134. So as you can see, using movie mode (which requires live view) and any other live view use comes with a price of additional wear and tear on the shutter mechanism.
Blessings,
Jesse
Tuesday, October 15, 2013
1964 Chevy Impala SS
This is a photo that brings back memories. Though I have never had an Impala, or other classic for that matter, I have owned two Trans Ams and a base model Firebird. And during the time I owned these cars I took plenty of photos of them, and other similar cars during outings with my car club buddies. So on a recent weekend trip to my in-laws for a wedding I got a chance to take some photos of my father-in-law's '64 Impala SS.
I only took seven shots in a quick impromptu photo shoot in the afternoon. Having the car parked in the grass with the sun filtering through the trees looked like ideal light for a good photo. The photo above is my favorite of the bunch, the others were either very similar or had the house in the background.
Blessings,
Jesse
 |
| 1964 Chevy Impala SS |
I only took seven shots in a quick impromptu photo shoot in the afternoon. Having the car parked in the grass with the sun filtering through the trees looked like ideal light for a good photo. The photo above is my favorite of the bunch, the others were either very similar or had the house in the background.
Blessings,
Jesse
Monday, October 14, 2013
Review of Generic Batteries After 3 Years of Use
Generic batteries can look like an considerable bargains when compared to the name brand varieties. But is this a case where you get what you pay for, or does the bargain bin provide an outstanding value in this situation? How does a $5-$10 generic battery compare to a $40-$50 brand name after steady use and are you paying for the name or does the branded battery justify the price? Read on and make the decision.
When we purchased our compact Canon camera, I knew I had to have at least one extra battery so as to always be prepared. Wanting to save money and not shell out at least another $40 for a Canon brand battery I went on the Internet hunt and came across www.bestbatt.com. They sell generic replacements at a significant discount over the name brand and we were able to to purchase two replacement batteries for $25 and some change with shipping. After 3+ years of use there is now a noticeable difference between the Canon that came with the camera and the two for $25 bargain bin batteries. The Canon still functions like it did from day one without any appearance of getting less pictures per charge, even while using the LCD screen 100% of the time and mixing in video recordings.
The generic batteries on the other hand, show a noticeable difference in performance. One of these batteries is virtually useless now as it no longer gets through a full two hour charge cycle with the canon charger - getting the full charge green light in half an hour or just a few minutes. While the charger thinks it is full, the camera says otherwise. With a fresh charge I am greeted with "Change the Battery Pack" on my LCD screen when attempting to use the camera for taking photos. For some reason, I can view all the photos I want with playback - but as soon as I switch to camera mode, the black screen 'change the battery pack' message is back. I haven't tried this battery for several months after it started doing this, so who knows it may have just needed a long rest - but I am guessing it is done.
The other generic has faired better and is still usable, but it is one that we do not like to depend on anymore and get a little nervous if it is in the camera and we don't want to miss a shot. This battery runs out of juice noticeably quicker than the Canon branded battery does and we mainly use it sparingly, typically while we charge the Canon battery. While three years of use out of two batteries for $25 isn't bad, the original Canon battery is still dependable and strong.
Long a proponent of generics in nearly every case, my experience with generic batteries for my small Canon camera has changed my mind for camera batteries. When we purchased our Nikon D5100 I was sure to purchase a Nikon brand spare battery for it, and I haven't been disappointed with the Nikon battery and don't worry about missing a shot due to a questionable battery.
Blessings,
Jesse
Saturday, October 12, 2013
The Faces of Facebook
A new app has been making the news rounds lately, showing profile pictures for every Facebook profile. The Faces of Facebook as it is named, shows the photos when zoomed in and different colored pixels when zoomed out, below is a screen shot.

The zoomed out photo looks like nothing more than digital noise and I think aptly sums up the whole Facebook nonsense: Digital noise. An much like digital noise in a photograph detracts from the photo, the noise of Facebook distracts and detracts from life with no real value.
While on the subject, check out the following links to Non Sequitur comics that speak to the subject: Imaginary friend's and Pre-Internet Social Networking. I think both make great points personnaly.
My last thought on the subject for this post is a challenge to anyone with a Facebook account: take a four week unannounced break, a full on total blackout. Log out of the service on all web browsers you use, mobile apps etc... and change any email settings (or even create an email filter to bypass your in-box altogether) so you get as little email as possible from Facebook. And during that time see how many of your Facebook "Friends" make any effort to contact or communicate with you in any meaningful, personal or intentional way (and asking why you haven't been on Facebook doesn't count). And if the break goes well, consider continuing it from four weeks to four months, then move to four quarters, then four years. You just might discover life in a whole new light again.
Blessings,
Jesse
Friday, October 11, 2013
Sometimes Its Nice Not Having a Camera
At first not having a camera with you being a good thing might seem like an odd thought on a photography site/blog, but bear with me for a moment and you might see my perspective on the idea. I still really enjoy taking pictures, and many times when I do not have a camera on me I find myself looking at a view, local wildlife or a brilliant sunset and think to myself how great of a picture that particular moment in time would make. I had this this as a first thought during a round of golf with some friends but a couple days later I had a new thought and a new perspective on the situation...
On a nice June Monday while some friends and I were enjoying a nice round of golf at Avalon Golf Club, a deer wandered out of the woods and meandered across the grass probably no more than 40 yards in front of us while we were on the tee box. As mentioned earlier, my first thought was that I wish I had my camera, as the scene would have been nice photo op had I had a camera at the ready. After a couple days, I realized how much of a blessing it can be to not have a camera on hand. Instead of worrying about composition, amount of zoom and exposure levels, I was able to just take in the moment and watch the young buck make his way past us on that sunny June day.
Many times a sunset, mountain landscape or a walk graced by the local wildlife can be much more appreciated when viewed with out the distractions of a viewfinder or LCD screen. So I would encourage you, not to give up on your camera and photography, but not to be chained to it either. Take a moment and enjoy part of God's creation free of distractions and you might find the moment can be more enjoyable when it is just experienced as it happens.
Blessings,
Jesse
Thursday, October 10, 2013
Converting an Image to Black and White with the GIMP
Some photos may not come out the way we anticipated, the weather may not cooperate when you are traveling
or have the time to take photographs which could end up leaving a final image that is
simply missing something. Or perhaps the scene just doesn't seem as
interesting upon final review as it may have seemed when framing the
photo in the viewfinder or LCD screen. And sometimes, a scene just lends
itself to be more appealing as a monochrome image.
The image below is one from my collection that wasn't anything very eye catching as a color photo, but after a black and white conversion is vastly improved. This photo was taken in Seattle several years back on a trip meeting up with my brother. A simple tutorial on using The GIMP program to convert photos to black and white follows the images.
Converting a photo to black and white with the GIMP program is a simple task that takes a little bit of experimenting with for the best results. The following is a simple path to follow to convert your images.
Step 1: Open the channel mixer, located under the color menu - components - channel mixer.
Step 2: Check the preview and monochrome check boxes. You can also resize the channel mixer window to get a larger sized preview image.
Step 3: Adjust the sliders (red will be defaulted to 100) to get your base settings close to optimal, we will add an extra adjustment after the channel mixer step to fine tune the look. I have found that on many images having the blue channel fairly close to the inverse of the green channel (say, 40 green -50 blue and/or similar combinations) yields pleasing results. When you are happy with the preview box, click OK. You can even save the slider settings for later use with the save option/button. Being able to save the black and white settings is a useful tool. To make things quicker I will typically size the image down before starting, get my channel mixer settings the way I want and then save them so I can apply them to the full sized image - this is a handy trick to boost performance if you find the channel mixer slower to respond.
Step 4: To fine tune our conversion after editing with the channel mixer we are going to duplicate the background layer and change the mode to multiply (to darken the image slightly) and lower the opacity so that we are just darkening the image slightly. You could of course, leave the opacity at 100% if the extra darkness works for the image. If you need to lighten the image slightly we can change the mode to screen and drop the opacity as needed.
Step 5: Export your image to JPG (or preferred format) for printing or web use and you are done. When doing edits like this I like to save a copy of the image in the native GIMP format (.xcf) so I have a working copy with all my extra layers if I need to revisit or tweak the image at a later time.
The black and white skyscraper image I have printed and hanging up in my office, this is so far my favorite black and white image I have made.
Blessings,
Jesse
The image below is one from my collection that wasn't anything very eye catching as a color photo, but after a black and white conversion is vastly improved. This photo was taken in Seattle several years back on a trip meeting up with my brother. A simple tutorial on using The GIMP program to convert photos to black and white follows the images.
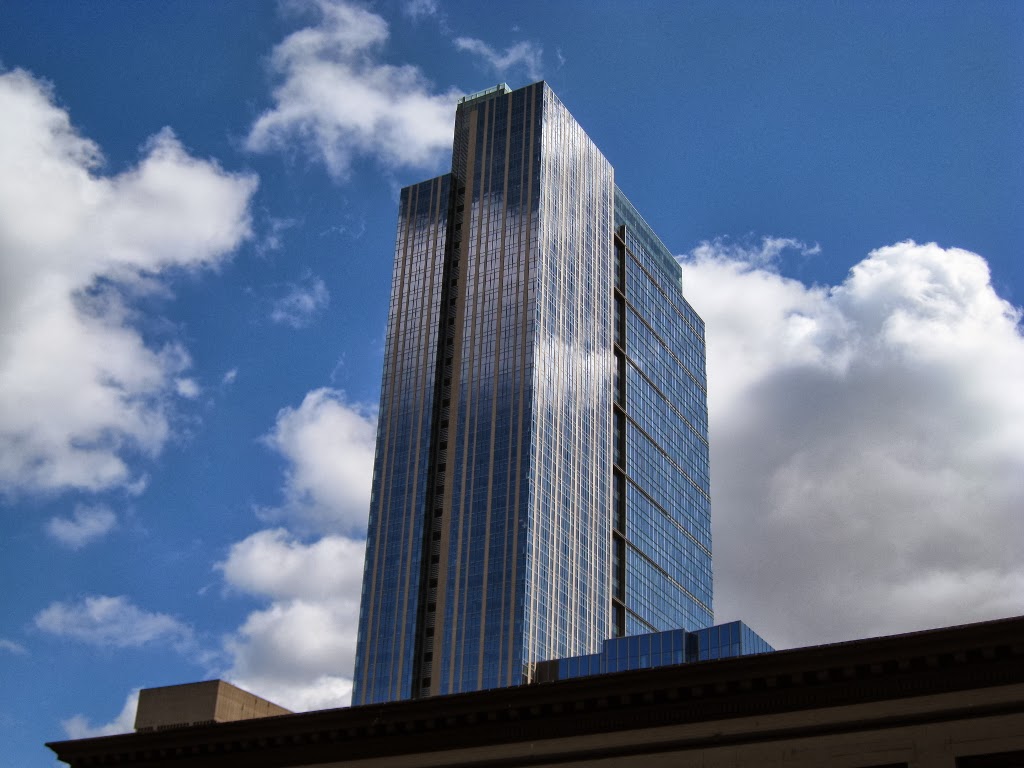 |
| Original Color Image |
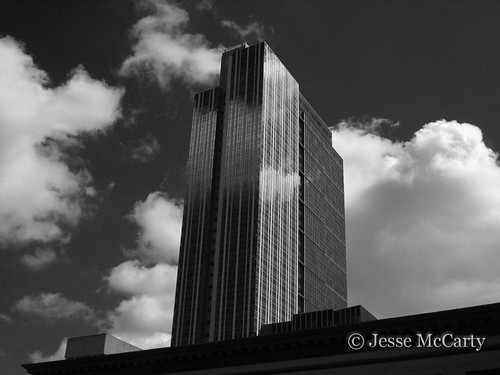 |
| Black and White Version |
Converting a photo to black and white with the GIMP program is a simple task that takes a little bit of experimenting with for the best results. The following is a simple path to follow to convert your images.
Step 1: Open the channel mixer, located under the color menu - components - channel mixer.
Step 2: Check the preview and monochrome check boxes. You can also resize the channel mixer window to get a larger sized preview image.
Step 3: Adjust the sliders (red will be defaulted to 100) to get your base settings close to optimal, we will add an extra adjustment after the channel mixer step to fine tune the look. I have found that on many images having the blue channel fairly close to the inverse of the green channel (say, 40 green -50 blue and/or similar combinations) yields pleasing results. When you are happy with the preview box, click OK. You can even save the slider settings for later use with the save option/button. Being able to save the black and white settings is a useful tool. To make things quicker I will typically size the image down before starting, get my channel mixer settings the way I want and then save them so I can apply them to the full sized image - this is a handy trick to boost performance if you find the channel mixer slower to respond.
Step 4: To fine tune our conversion after editing with the channel mixer we are going to duplicate the background layer and change the mode to multiply (to darken the image slightly) and lower the opacity so that we are just darkening the image slightly. You could of course, leave the opacity at 100% if the extra darkness works for the image. If you need to lighten the image slightly we can change the mode to screen and drop the opacity as needed.
Step 5: Export your image to JPG (or preferred format) for printing or web use and you are done. When doing edits like this I like to save a copy of the image in the native GIMP format (.xcf) so I have a working copy with all my extra layers if I need to revisit or tweak the image at a later time.
The black and white skyscraper image I have printed and hanging up in my office, this is so far my favorite black and white image I have made.
Blessings,
Jesse
Wednesday, October 9, 2013
Wedding Rings & Fall Leaves
Taken a couple of years ago, this photo was inspired by some photos from our wedding, I had an idea to take our wedding rings and set them up on some leaves that were in the fall color change process, similar to the flower photograph from our wedding when the rings were new and clean (as opposed to their not as shiny state in this photo). This was a quick and easy shot to setup with pleasant results, taken with my older Canon PowerShot SD950.
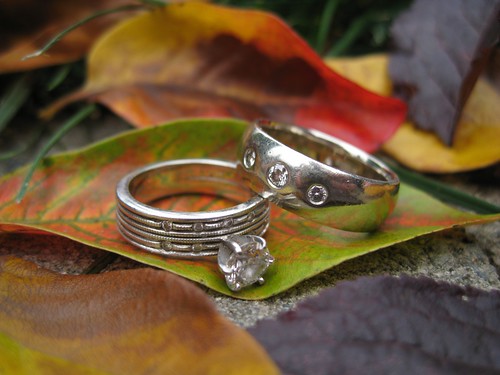
Next time I decide to set up a shot like this, I will do it after having our rings cleaned.
Blessings,
Jesse
Next time I decide to set up a shot like this, I will do it after having our rings cleaned.
Blessings,
Jesse
Monday, September 2, 2013
Saving an Underexposed Photo
As mentioned in a previous post comparing RAW and JPG photos, RAW gives you additional flexibility in recovering improperly exposed images. While taking photos of hummingbirds at my in-laws, I ended up with a few much too dark photos (discussed in my last post, you can read more about it there). These photos were taken on my usual RAW + JPG setting and you can see the original (JPG) and developed image from the RAW file below.
To get from the original to the final, the irst step is importing the RAW file into your RAW editor and letting the program do any base settings. Darktable (the RAW editor I use) applies a base curve and sharpening upon import.
After importing its time to adjust the exposure and white balance. The white balance would be optional, as I like to add a slight boost to the color temperature (as many digital cameras have a tendency to produce colder color tones) on many photos. The next two steps are also optional, but were used to produce the image below: perform a slight de-noise and then a slight sharpen to the image. Lastly boost the fill light to finish out the image recovery and we are done after exporting the finished product.
While the developed photo is still nothing amazing, this does highlight the possibilities for recovery and the quality of a drastically altered RAW photo. This shows a big advantage of the RAW format over the JPG format, as you cannot achieve the same results - even by applying the same exact procedure to the JPG file in the same program.
Blessings,
Jesse
To get from the original to the final, the irst step is importing the RAW file into your RAW editor and letting the program do any base settings. Darktable (the RAW editor I use) applies a base curve and sharpening upon import.
After importing its time to adjust the exposure and white balance. The white balance would be optional, as I like to add a slight boost to the color temperature (as many digital cameras have a tendency to produce colder color tones) on many photos. The next two steps are also optional, but were used to produce the image below: perform a slight de-noise and then a slight sharpen to the image. Lastly boost the fill light to finish out the image recovery and we are done after exporting the finished product.
 |
| Original, too dark photo |
 |
| Edited photo |
Blessings,
Jesse
Friday, August 30, 2013
Photographing Hummingbirds
Getting a shot of a hummingbird takes patience, and plenty of it. Not only are they fast, but they don't hang around in one spot for very long. But you can be rewarded with a satisfying image if you wait long enough.
During a recent visit to my in-laws' house, I had a chance to take a shot at getting a hummingbird photo. My first thought was to set my camera on shutter priority at 1/640 to try an capture the fast movement. That didn't pan out as the 1/640 images were way too dark on an overcast day for the lens I was using (55-300mm f/4.5-5.6). I could have boosted the IS, but I had a space out and didn't even think about ISO settings and my auto ISO settings were off so the camera stayed at ISO 200.
Next thought was to use the flash to capture the fast moving hummingbirds. This proved what would be the right approach as I got the below photo of a hummingbird taking flight.
I enjoyed my short little hummingbird photo shoot, and look forward to getting another shot. Next time I will remember my auto ISO setting (or boost it manually) if there is not enough light for faster shutter speeds.
Blessings,
Jesse
During a recent visit to my in-laws' house, I had a chance to take a shot at getting a hummingbird photo. My first thought was to set my camera on shutter priority at 1/640 to try an capture the fast movement. That didn't pan out as the 1/640 images were way too dark on an overcast day for the lens I was using (55-300mm f/4.5-5.6). I could have boosted the IS, but I had a space out and didn't even think about ISO settings and my auto ISO settings were off so the camera stayed at ISO 200.
Next thought was to use the flash to capture the fast moving hummingbirds. This proved what would be the right approach as I got the below photo of a hummingbird taking flight.
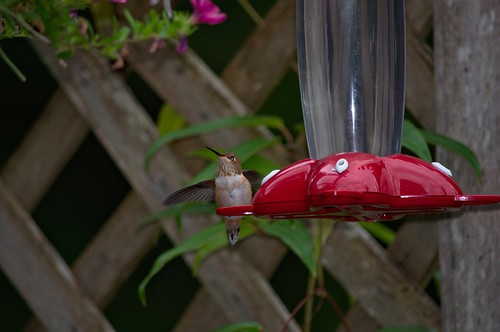 |
| Taking flight 1/200 @ f/5.6 ISO200 - flash used |
I enjoyed my short little hummingbird photo shoot, and look forward to getting another shot. Next time I will remember my auto ISO setting (or boost it manually) if there is not enough light for faster shutter speeds.
Blessings,
Jesse
Tuesday, August 13, 2013
Photographing Lightning
I have always wanted to get a good shot of lightning, but we don't have many electrical storms in Western Washington. On a recent vacation to Eastern Washington/North Western Idaho I got a chance to try and get that shot one evening.
With a forecast for thunderstorms increasing as the weekend neared, my wife and I were excited at the chance to see a good storm - and we would not be disappointed at all! This storm was quite large, lengthy and for a good portion seemingly right outside our window/on top of us. After taking a couple of videos the battery in our camera was drained to the point where the shutter release was disabled and the spare battery was in the car. Well, after unplugging the white noise machine (for our one year old, who was asleep) in case something hit the hotel, our little one woke up and needed a diaper change something fierce - but like the spare battery, the wipes were in the car. Now I had a must need trip to the car and would retrieve the battery while I was there and get my change to attempt to take a photo of the storm.
So, camera on the tripod and remote shutter release cable at the ready, I thought I would try a 30 second exposure and try and time it right to get a bolt somewhere in that 30 seconds - after two exposures that was very apparent a waste of time and effort. Next thought, put the camera on bulb exposure @ f/11 and leave the shutter open till a bolt flashes by (again, trying to time it right). This strategy worked with a little luck and resulted in the below shot with just over a one second exposure.
I could have had more chances at some amazing shots, but as mentioned earlier our spare battery was in the car during the more intense part of the storm. Sometimes a little luck is just what you need for an amazing shot, sure lightning photos may be much easier if you have a lightning trigger, but for most of us we will have to rely on patience and the right timing to capture the lightning.
Blessings,
Jesse
With a forecast for thunderstorms increasing as the weekend neared, my wife and I were excited at the chance to see a good storm - and we would not be disappointed at all! This storm was quite large, lengthy and for a good portion seemingly right outside our window/on top of us. After taking a couple of videos the battery in our camera was drained to the point where the shutter release was disabled and the spare battery was in the car. Well, after unplugging the white noise machine (for our one year old, who was asleep) in case something hit the hotel, our little one woke up and needed a diaper change something fierce - but like the spare battery, the wipes were in the car. Now I had a must need trip to the car and would retrieve the battery while I was there and get my change to attempt to take a photo of the storm.
So, camera on the tripod and remote shutter release cable at the ready, I thought I would try a 30 second exposure and try and time it right to get a bolt somewhere in that 30 seconds - after two exposures that was very apparent a waste of time and effort. Next thought, put the camera on bulb exposure @ f/11 and leave the shutter open till a bolt flashes by (again, trying to time it right). This strategy worked with a little luck and resulted in the below shot with just over a one second exposure.
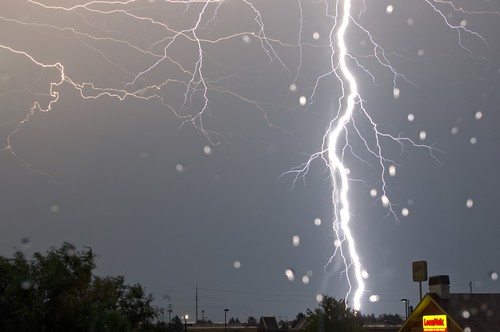 |
| Post Falls, Idaho Lightning Strike |
Blessings,
Jesse
Monday, August 12, 2013
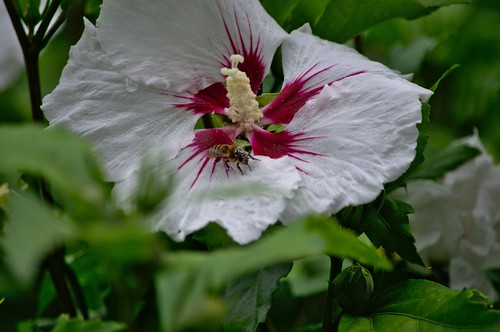
Honey Bees and Hibiscus
Something about photographing bees can be unnerving, granted honey bees pretty much leave you alone unless provoked - but anyone who has been stung as a child probably still has that slight unease lurking somewhere in the deep recesses of ones mind. Braving the wrath of the winged sweet makers can sure lead to some memorable photos. The two below are from my in-law's house while we were visiting to have a first birthday party for our son.
Both of these were taken with a 55-300mm lens which puts a nice distance between the stinger and the photographer.
Blessings,
Jesse
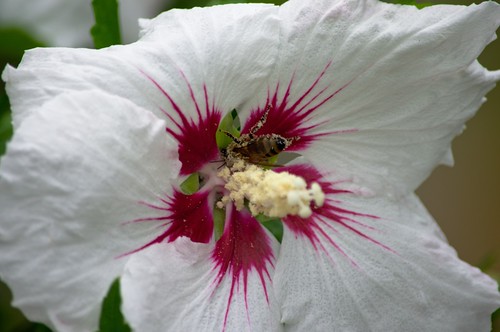 |
| Collecting Pollen |
 |
| Ready for Flight |
Both of these were taken with a 55-300mm lens which puts a nice distance between the stinger and the photographer.
Blessings,
Jesse
Saturday, August 3, 2013
Shooting the Daylight Moon
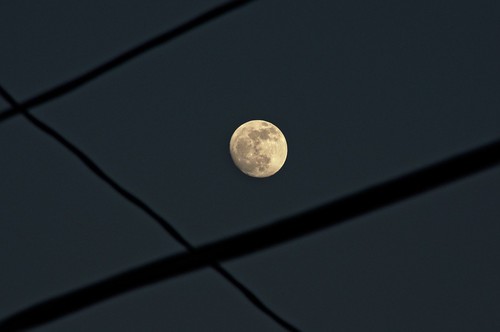
Shooting the moon in the daylight poses more challenges than it does at night when all we have to worry about is proper exposure on the moon itself. One evening as the sun was going down and the moon was already up, I set out to try and get some shots of the moon against a nice blue background.
Well the light blue background didn't come out to anything exciting as the moon was over exposed and lacked detail when the sky showed up on camera in the lighter blue. However, getting a good exposure on the moon rendered the sky a much darker hue. While not the look I was initially setting out for, this was my favorite of the few I took of the evening moon as the daylight faded.
For exposure on this photo we have 1/125 second @ f/11, ISO 200. Might try again on another blue sky day and see if different results can be attained.
Blessings,
Jesse
Well the light blue background didn't come out to anything exciting as the moon was over exposed and lacked detail when the sky showed up on camera in the lighter blue. However, getting a good exposure on the moon rendered the sky a much darker hue. While not the look I was initially setting out for, this was my favorite of the few I took of the evening moon as the daylight faded.
 |
Blessings,
Jesse
Saturday, July 27, 2013
RAW vs. JPG
To start, this post is not going to be what you may see on many other sites or magazines trying to convince you that you need to shoot RAW (if you have that capability) or on the flip side try and convince you that JPG is the way to go. This is simply meant as an informative post from my experiences on the merits as well as the pros and cons of either format.
So with that said, if you are unfamiliar with RAW formats, (or new to photography - especially DSLR photography) RAW is just what the name implies: an unprocessed, typically uncompressed (or minimally compressed) image file containing all the information seen by the camera's sensor. JPG on the other hand is a compressed and processed format. Every digital camera applies sharpening, color corrections and other image processing (based on camera settings) to every photo before the final JPG file is saved on the memory card.
RAW files contain the unprocessed data from the image sensor and will need to be opened in a RAW editor to be developed before use for on-line or printing. The developing does add an additional step to your work-flow, but I have found an advantage to this is that many times all that is needed is to import the RAW file, let the RAW editor do its default sharpening and base curve, and then export the file to get an image that looks better than the flat JPG file straight from the camera. This development step also gives you complete control over the development process and the ultimate results in the final image, of course the trade off is in extra time.
The extra data in the RAW file also gives you more flexibility to recover or improve an image that may have otherwise been destined for the take and file never to be shared or looked over again pile. Another interesting tidbit with RAW file's is the overall pixel dimensions. While my JPG files from my Nikon D5100 are 4928x3264 the RAW files come out slightly larger at 4946x3280. RAW files will also be much larger in file size. While the JPG images my camera takes average around 5-8 MB, the RAW files average 15-20MB and once processed, the exported JPG files are typically just as big as the original RAW files. So you will be looking at a significant boost in needed storage space when dealing with RAW files (a somewhat moot point when its pretty difficult to get anything less than a 320GB drive in a computer these days, and more common to have at least a 500GB drive).
When it comes to JPG, the camera does all the processing. You will be able to make changes to in camera settings, but ultimately the camera has the final say. You can of course do more development to a JPG file in many image editing programs, but you will have some limitations that are not present in the RAW editing process. Shooting JPG files also reduces your photo archive storage footprint, as they take up significantly less space. In many scenarios the JPG from the camera has all the quality one would expect and need, with some images needing just a slight adjustment after the fact in an image editor.
Another option is the RAW+JPG setting on your camera (if available). I find that I use this setting more and more lately as it gives you the best of both worlds. You have the RAW file available when you want or need more creative/development options and you also have the quick snap right out of the camera available for printing and sharing on-line on demand. The biggest disadvantages to the RAW+JPG setting are: a reduced memory card capacity, extra hard drive space required for storing and backing up all your photos and the extra time needed for sorting and managing the extra files (RAW,JPG & JPG export of the RAW file).
Below is a a quick sample to illustrate some of the points mentioned above:
What is best is ultimately up to the individual, I have been pleased with the RAW+JPG option for a good balance between artistic photos and family photos. Also not leaving the camera on RAW only means my bride can take and download photos while I am at work with out having to learn an extra import/export step if the camera happened to be left on RAW only.
Blessings,
Jesse
So with that said, if you are unfamiliar with RAW formats, (or new to photography - especially DSLR photography) RAW is just what the name implies: an unprocessed, typically uncompressed (or minimally compressed) image file containing all the information seen by the camera's sensor. JPG on the other hand is a compressed and processed format. Every digital camera applies sharpening, color corrections and other image processing (based on camera settings) to every photo before the final JPG file is saved on the memory card.
RAW files contain the unprocessed data from the image sensor and will need to be opened in a RAW editor to be developed before use for on-line or printing. The developing does add an additional step to your work-flow, but I have found an advantage to this is that many times all that is needed is to import the RAW file, let the RAW editor do its default sharpening and base curve, and then export the file to get an image that looks better than the flat JPG file straight from the camera. This development step also gives you complete control over the development process and the ultimate results in the final image, of course the trade off is in extra time.
The extra data in the RAW file also gives you more flexibility to recover or improve an image that may have otherwise been destined for the take and file never to be shared or looked over again pile. Another interesting tidbit with RAW file's is the overall pixel dimensions. While my JPG files from my Nikon D5100 are 4928x3264 the RAW files come out slightly larger at 4946x3280. RAW files will also be much larger in file size. While the JPG images my camera takes average around 5-8 MB, the RAW files average 15-20MB and once processed, the exported JPG files are typically just as big as the original RAW files. So you will be looking at a significant boost in needed storage space when dealing with RAW files (a somewhat moot point when its pretty difficult to get anything less than a 320GB drive in a computer these days, and more common to have at least a 500GB drive).
When it comes to JPG, the camera does all the processing. You will be able to make changes to in camera settings, but ultimately the camera has the final say. You can of course do more development to a JPG file in many image editing programs, but you will have some limitations that are not present in the RAW editing process. Shooting JPG files also reduces your photo archive storage footprint, as they take up significantly less space. In many scenarios the JPG from the camera has all the quality one would expect and need, with some images needing just a slight adjustment after the fact in an image editor.
Another option is the RAW+JPG setting on your camera (if available). I find that I use this setting more and more lately as it gives you the best of both worlds. You have the RAW file available when you want or need more creative/development options and you also have the quick snap right out of the camera available for printing and sharing on-line on demand. The biggest disadvantages to the RAW+JPG setting are: a reduced memory card capacity, extra hard drive space required for storing and backing up all your photos and the extra time needed for sorting and managing the extra files (RAW,JPG & JPG export of the RAW file).
Below is a a quick sample to illustrate some of the points mentioned above:
 |
| JPG from the camera |
 |
| Developed RAW file |
What is best is ultimately up to the individual, I have been pleased with the RAW+JPG option for a good balance between artistic photos and family photos. Also not leaving the camera on RAW only means my bride can take and download photos while I am at work with out having to learn an extra import/export step if the camera happened to be left on RAW only.
Blessings,
Jesse
Thursday, July 18, 2013
New Town, New Photo Oportunities
Moving to another town, even one that is only a few miles away brings with it much excitement and work. Along with everything associated with moving comes the settling in part and then figuring out new routines.
Moving from your old town you have your beaten paths and go to spots for your favorite photos. The river bank you could walk to, a local park or a favorite view for sunset photos. The new town brings with it a chance to explore and find new favorite spots for your go to photos and expand your portfolio - a journey I am looking forward to taking after our recent move - stay tuned!
Blessings,
Jesse
Monday, June 24, 2013
Photographing Whales
On June 2nd, my wife and I were finally able to go on the whale watching trip we have been wanting to do for years. We booked with Island Adventures out of Anacortes and our day started out and would stay warm and sunny. Though we were very glad to have dressed in a couple extra layers as it wasn't super warm once we were underway with the wind chill on the water.
Before our departure, I set up the camera prepared for fast moving animals. Shutter priority ( at 1/640, or higher on some occasions), continuous release and continuous focus servo. Even with the camera set on burst, it took me a while before I actually started utilizing the feature - not being used to using it I would out of habit let off of the shutter release after the first frame.
Being ready at the right moment and trying to predict when the animals would surface was a bit harder than I thought, and resulted in many dorsal fin shots. A definite photographic learning experience, and one I would highly recommend to anyone (especially those who love nature photography). Even with VR and the relatively light combination of my D5100 & 55-300mm lens, framing and keeping the camera steady posed a challenge from a moving boat. It was much easier when the captain shut the engines down so we can drift and watch the whales in the calm seas.
Besides the whales we saw many sea birds (both swimming and in flight), including a couple bald eagles, and some fleeting glimpses of some harbor porpoises. The harbor porpoise as the most challenging and camera shy animal we would see all day. They are very fast and by the time you spot one they may only surface once or twice more before they are out of view.
We would really love to go whale watching again, and next time (if I have one) I will be sporting a monopod and paying closer attention to the photographer that works with the tour company as he knows more what to expect and came out with some fantastic photos.
Blessings,
Jesse
Before our departure, I set up the camera prepared for fast moving animals. Shutter priority ( at 1/640, or higher on some occasions), continuous release and continuous focus servo. Even with the camera set on burst, it took me a while before I actually started utilizing the feature - not being used to using it I would out of habit let off of the shutter release after the first frame.
Being ready at the right moment and trying to predict when the animals would surface was a bit harder than I thought, and resulted in many dorsal fin shots. A definite photographic learning experience, and one I would highly recommend to anyone (especially those who love nature photography). Even with VR and the relatively light combination of my D5100 & 55-300mm lens, framing and keeping the camera steady posed a challenge from a moving boat. It was much easier when the captain shut the engines down so we can drift and watch the whales in the calm seas.
Besides the whales we saw many sea birds (both swimming and in flight), including a couple bald eagles, and some fleeting glimpses of some harbor porpoises. The harbor porpoise as the most challenging and camera shy animal we would see all day. They are very fast and by the time you spot one they may only surface once or twice more before they are out of view.
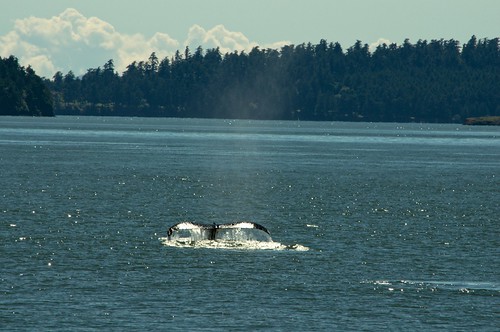 |
| The Humpback's Tail |
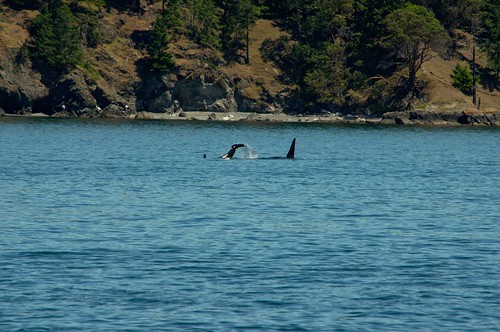 |
| Orca calf doing a tail slap |
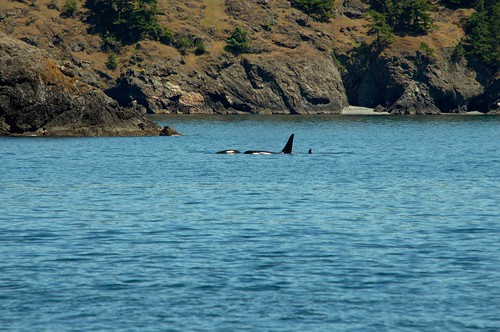 |
| "Kissing" Orcas |
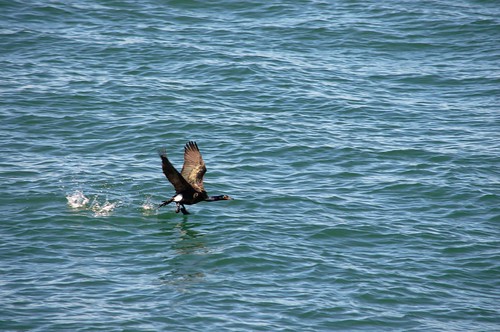 |
| Cormorant Taking Flight |
We would really love to go whale watching again, and next time (if I have one) I will be sporting a monopod and paying closer attention to the photographer that works with the tour company as he knows more what to expect and came out with some fantastic photos.
Blessings,
Jesse
Monday, June 17, 2013
Collapsed Skagit River Bridge At Night
The saga of no bridge continues in our usually quite and low key valley. Construction crews are working on the temporary replacement span and we should have I5 available again sometime this week.
The other day I stopped by my usual observation area after sunset and took a few pictures of the night crew working on the bridge. I am really enjoying the ability to do some night photography now that I have an SLR and the remote cable release makes it much more pleasant - a must have for any longer exposure photography with a tripod. In fact, any tripod work is better with the cable release.
Once the temporary span is in place the area will get some relief from the traffic congestion. Then they will start building the permanent span next to the bridge and when they are ready to put it in place, we're looking at probably two weeks while they remove the temporary span and install the permanent one. What a crazy time this has been, looking forward to it being done with and everything back to normal.
Blessings,
Jesse
The other day I stopped by my usual observation area after sunset and took a few pictures of the night crew working on the bridge. I am really enjoying the ability to do some night photography now that I have an SLR and the remote cable release makes it much more pleasant - a must have for any longer exposure photography with a tripod. In fact, any tripod work is better with the cable release.
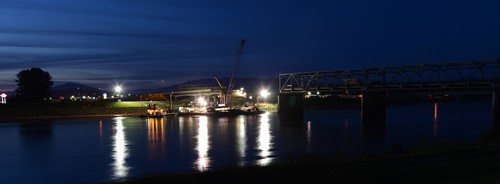 |
| Panoramic of the bridge work |
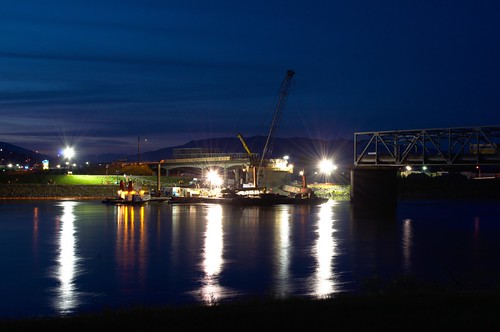 |
| Work crews at night |
Once the temporary span is in place the area will get some relief from the traffic congestion. Then they will start building the permanent span next to the bridge and when they are ready to put it in place, we're looking at probably two weeks while they remove the temporary span and install the permanent one. What a crazy time this has been, looking forward to it being done with and everything back to normal.
Blessings,
Jesse
Tuesday, May 28, 2013
Getting A Camera Back From The Dead
Sometimes a random idea can result in a pleasant surprise. Such was the case with our Canon PowerShot SD950, which we had written off as dead last summer. The camera took a short drop and hit the hard floor of my in-laws boat. After that the camera was only half working, it would come on sometimes but most of the time was dead. A few days later the camera would not even turn on.
Well, for reason's unknown, I decided to put the battery in the camera and turn it on yesterday. And too my surprise, the camera turned on, took photos and video and is working like a charm. This made my day, as I really liked the camera and even with a DSLR the ultra-compact is nice to have available for many situations and can save wear and tear on the SLR.
Just goes to show that sometimes things are not as they might seem.
Blessings,
Jesse
Monday, May 27, 2013
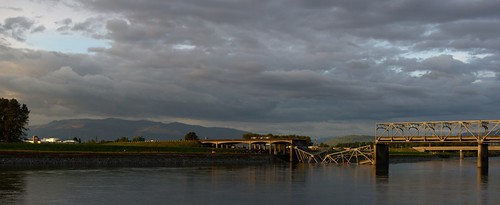
Collapsed Skagit River Bridge
There are some things you never expect to see, especially when you live in small town Skagit Valley. A collapsed bridge is definitely high on that list, but for all of us Skagit Valley residents and the 70,000+ cars a day traveling on Interstate 5 a bridge with a quarter of it collapsed and now residing in the cold waters of the river below is the surreal reality.
On Thursday, May 23rd an over-height truck struck the overhead trusses of the I-5 bridge over the Skagit River, causing a section of the bridge to collapse. My wife and I were heading north to look at a house and were on the bridge about an hour an 40 minutes prior to the accident. We were on our way home about a half hour after the incident and saw first hand from the parallel bridge the aftermath and cause of the traffic mess we were in.
On Saturday, I took some time to take some photos from the nearby levee of the scene you never expect to see in person.
The bridge has become something of a local tourist attraction for locals and not so locals alike. Typically during the month April and the annual Tulip Festival we will have people stop and ask gave directions to the Tulip fields, and the other day while on a walk my wife and I had someone stop and ask how to get to the bridge for a visual vantage point.
Thank God this wasn't worse and no one died, hopefully they will get it repaired or replaced in a timely manner as the traffic is going to be a major issue until there is a new (or repaired) bridge.
Blessings,
Jesse
On Thursday, May 23rd an over-height truck struck the overhead trusses of the I-5 bridge over the Skagit River, causing a section of the bridge to collapse. My wife and I were heading north to look at a house and were on the bridge about an hour an 40 minutes prior to the accident. We were on our way home about a half hour after the incident and saw first hand from the parallel bridge the aftermath and cause of the traffic mess we were in.
On Saturday, I took some time to take some photos from the nearby levee of the scene you never expect to see in person.
 |
| Panoramic of the entire bridge |
 |
| Vertical Panoramic of part of the bridge |
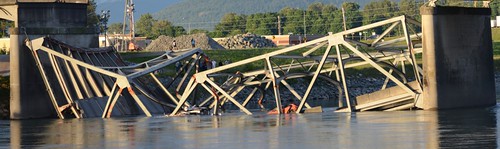 |
| Zoomed in panoramic of the collapsed section |
The bridge has become something of a local tourist attraction for locals and not so locals alike. Typically during the month April and the annual Tulip Festival we will have people stop and ask gave directions to the Tulip fields, and the other day while on a walk my wife and I had someone stop and ask how to get to the bridge for a visual vantage point.
Thank God this wasn't worse and no one died, hopefully they will get it repaired or replaced in a timely manner as the traffic is going to be a major issue until there is a new (or repaired) bridge.
Blessings,
Jesse
Wednesday, May 22, 2013
Removing The Sunny Day Haze
Nothing like a bright sunny day to get you outside, especially come spring time when the daylight hours begin to last longer and the cold chill of winter starts its slow retreat to make way for the long awaited summer warmth.
While a nice break from winter weather, the bright sun poses some definite challenges for photography, with one being the bright hazy and washed out look that ends up in many photos. This can be be fixed with some digital development if the image isn't too washed out. I have had some good luck fixing the haze with The GIMP program and below have the general outline of my steps, though with this particular demo image my results weren't worth much as it was quite hazy.
First here is the original photo, nothing spectacular - just a view from a local observatory that came out hazy and washed out looking:
 |
| Original Photo |
For images that have some unwanted haze, but aren't too far glazed over below are my steps I typically use in The GIMP program that I have had some luck using to eliminate much of the haze and improve the photo:
Optionally, warm the color tones up slightly (as I mentioned in a previous post)
Step 1: Adjust brightness (down 10-30 points or so) and contrast (up 5-10 points or what looks appropriate)
Step 2: Adjust levels down to .95 - .85 from the 1.0 default middle option (again, this varies with the photo and level of haze)
Step 3: Adjust curves in a manner similar to the below screen shot, pulling the lower left curve down slightly and the upper right up slightly - adjusting as needed for the particular image.

Working with a RAW image is where we can really get some great results on images that may appear to be throw aways. Some we will be able to get great shots from and some may only be turned from a discard into merely a decent image.
Using Darktable, follow the below steps as a template to bring out the potential in your hazy sunny day images:
1: Exposure adjustment - boost the black slider slightly (toward the right) and leave the exposure adjustment alone.
2: Local Contrast - boost contrast and detail slightly (to the right)
3: Levels - Adjust the middle bar slightly to the right.
Three quick steps and below is the final result:
 |
| Darktable Adjusted Final |
The more I work with Darktable to develop RAW images, the more I see the advantages to the RAW format. The results are often much better, even if the only adjustments are the base curve and sharpening the program applies upon import and the extra development time is very minimal.
Anyway, there you have it: a good starting point to help bring out some pop to an image otherwise destined for the discard pile. Happy developing!
Blessings,
Jesse
Tuesday, May 21, 2013
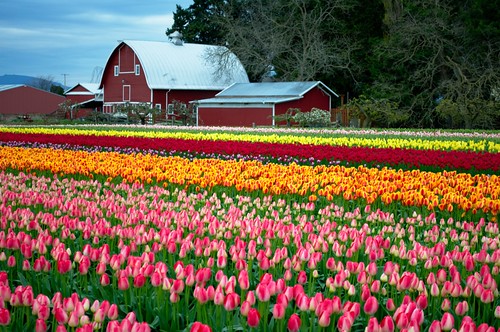
2013 Tulip Field Photos
May is coming to a close and the local Tulip festival that concluded at the end of April seems like ancient history. And while many plants are still in bloom, the tulips prefer colder weather and have all either been topped by bulb producers or have lost their petals naturally.
Tulips make fantastic photos every year, and this year I really only had a brief window for photos. With a nine month old, schedules revolve around the little one and my wife and I were just able to make the locals night at one of the local tulip fields toward the end of the evening. It was a cooler and cloudy evening but it was my one shot for tulip photos this year.
More photos next season, stay tuned.
Blessings,
Jesse
Tulips make fantastic photos every year, and this year I really only had a brief window for photos. With a nine month old, schedules revolve around the little one and my wife and I were just able to make the locals night at one of the local tulip fields toward the end of the evening. It was a cooler and cloudy evening but it was my one shot for tulip photos this year.
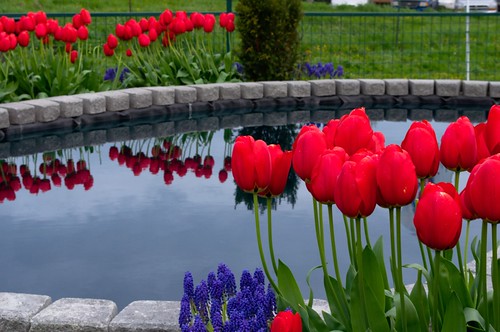 |
| Tulip Reflections |
 |
| Pink Tulips and Lady Liberty |
|
| Tulips and the Barn at Tulip Town |
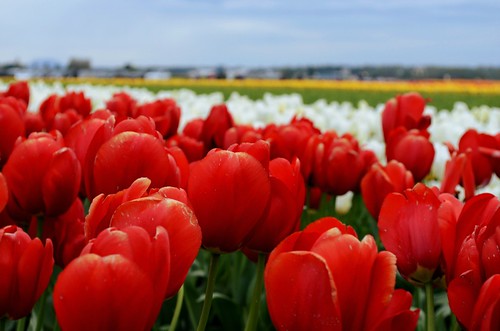 |
| Red Tulips at Tulip Town |
More photos next season, stay tuned.
Blessings,
Jesse
Saturday, May 4, 2013
A Quick Adjustment To Improve Your Digital Photos
From my experience, digital cameras are notorious for rendering photos with color temperatures on the colder side - especially if you use auto white balance. This isn't to say that every photo you take with a digital camera will look like it was taken in the coldest winter in the arctic circle, but the image may not look as inviting as it did when taken when a steely gray/blue cast permeates the scene.
This can be addressed with a quick and simple color balance adjustment to warm up the color tones. Using The GIMP program (free, open source and available cross-platform) simply go to the colors menu and then choose color balance. You will be greeted with which ranges to adjust and three adjustment sliders: Cyan/Red, Magenta/Green and Yellow/Blue.
For most images you don't need to do much, a simple +5 on the Cyan/Red scale and a -5 on the Yellow/Blue scale done with the Midtones option selected is just enough to do the trick.

For illustrative purposes I have an old photo taken of my old cat with my first decent digital camera, a Minolta Dimage S304. The first image is the untouched photo from the camera, followed by one done on Midtones only with a +10, 0, -10 on the scales and the last one with a +5, 0, -5 adjustment done all all three range adjustments.
As you can see, it doesn't take much to positively change the final image. And if you are new to digital development, this is a great place to start that will improve many photos all the while not being difficult.
Blessings,
Jesse
This can be addressed with a quick and simple color balance adjustment to warm up the color tones. Using The GIMP program (free, open source and available cross-platform) simply go to the colors menu and then choose color balance. You will be greeted with which ranges to adjust and three adjustment sliders: Cyan/Red, Magenta/Green and Yellow/Blue.
For most images you don't need to do much, a simple +5 on the Cyan/Red scale and a -5 on the Yellow/Blue scale done with the Midtones option selected is just enough to do the trick.

For illustrative purposes I have an old photo taken of my old cat with my first decent digital camera, a Minolta Dimage S304. The first image is the untouched photo from the camera, followed by one done on Midtones only with a +10, 0, -10 on the scales and the last one with a +5, 0, -5 adjustment done all all three range adjustments.
 |
| Original |
 |
| +10, 0, -10 - Midtones Only |
 |
| +5, 0, -5 Shadows, Midtones and Highlights |
As you can see, it doesn't take much to positively change the final image. And if you are new to digital development, this is a great place to start that will improve many photos all the while not being difficult.
Blessings,
Jesse
Monday, April 22, 2013
City At Night - Long Exposures of Playgrounds
City parks, and the playground toys they typically contain, are usually bustling with activity and the laughter of little ones enjoying the out doors. Not so at night, which gave me an idea that the playground equipment might make an interesting long exposure photo, as many long exposure photographs have an entirely different look than a daylight photo - a look that can often have an almost post-apocalyptic feel to it.
The look is not quite what I expected, though the look is still vastly different than daylight hour photos. This project was definitely a fun experiment and one I am very happy with the results and also likely to add to sometime in the future. On this photo excursion, I found that the ambient light makes a huge difference with these types of photos, not only on how long you will need to leave the shutter open, but also on the overall look and feel of the final image - especially in the color tones. The ones that I found worked the best were taken long enough after sunset for any last lingering rays of sunlight to have passed, leaving street lamps and exterior lighting of any surrounding businesses as the only light sources. Below are my favorites from the shoot:
I also took a couple of long exposure shots in my back yard (see long exposure of tulips), and below is one of a not yet leafing tree with stars and clouds visible.
Two take-away tidbits I figured out while taking these pictures: First, 30 seconds feels like an excruciatingly long wait standing in the dark on an empty playground waiting for a shutter to finally close. Second: bring a powerful enough light to aid with focusing if there is not enough ambient light. A small LED light just doesn't have enough range for auto focus to work or allow you to see for manual focus. Also, with these types of shots you will find a good remote shutter release is worth every penny.
Blessings,
Jesse
The look is not quite what I expected, though the look is still vastly different than daylight hour photos. This project was definitely a fun experiment and one I am very happy with the results and also likely to add to sometime in the future. On this photo excursion, I found that the ambient light makes a huge difference with these types of photos, not only on how long you will need to leave the shutter open, but also on the overall look and feel of the final image - especially in the color tones. The ones that I found worked the best were taken long enough after sunset for any last lingering rays of sunlight to have passed, leaving street lamps and exterior lighting of any surrounding businesses as the only light sources. Below are my favorites from the shoot:
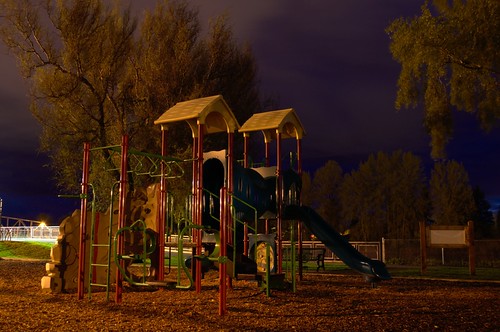 |
| 30 Second Exposure |
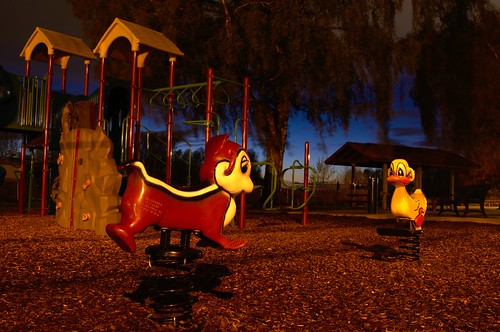 |
| 20 Second Exposure |
 |
| 20 Second Exposure |
I also took a couple of long exposure shots in my back yard (see long exposure of tulips), and below is one of a not yet leafing tree with stars and clouds visible.
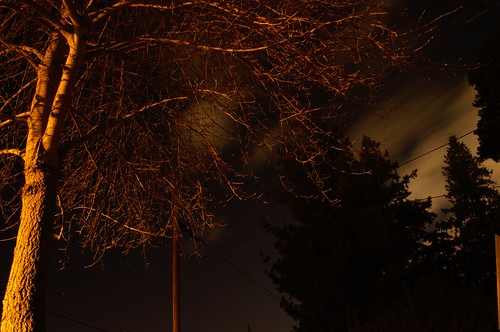 |
| One Minute Exposure |
Two take-away tidbits I figured out while taking these pictures: First, 30 seconds feels like an excruciatingly long wait standing in the dark on an empty playground waiting for a shutter to finally close. Second: bring a powerful enough light to aid with focusing if there is not enough ambient light. A small LED light just doesn't have enough range for auto focus to work or allow you to see for manual focus. Also, with these types of shots you will find a good remote shutter release is worth every penny.
Blessings,
Jesse
Saturday, April 20, 2013
In Camera Black & White vs. Software Conversion
Black and white photography was never something I pursued personally - appreciated yes, but until recently not something I had a personal interest in producing. That all changed after being the adviser for a middle school photography club after the black and white assignment. Participating with the students sparked an interest in Black and White photography for me, and I will do a few conversions here and there through out any given year. I also have some ideas for intentionally setting out to create an image meant to be black and white as opposed to converting some of my collection as an after thought for images that look like they will work well as a monochrome.
Now when we look at modern digital cameras, we will always find a dedicated black and white mode where the camera will do all the monochrome processing. This may make it quick and easy to create black and white photos, but this does come with two big drawbacks if you select this mode to create a black and white photograph. The first being the loss of any color information (unless you are shooting with a DSLR on raw or raw+jpg). This may seem trivial, especially if you are looking to create a black and white work, but when going this route you just may loose an image that would be better had the color information been retained. Number two is a lack of control with the overall final image, you may be able to fine tune a little bit with software but the camera has pretty much set the foundation.
When it comes to software conversion, the big drawback is the added time it will take to do the conversion. While its true that you can have some base presets in most software, these presets would typically be image specific and won't always produce the look you are trying to achieve with other images. It may work as a good baseline, but you will likely need to do some more fine tuning. Really a small trade off for having full creative control over you final product.
So, with that in mind, below are some comparisions of an in camera black and white next to an image converted in software. To set up this shot, I placed my camera on a tripod and set it for a monochrome image on RAW+JPG. This way, I will have the full color information in the RAW file as well as the in camera processed monochrome image as a JPG.
For reference and comparison, 1st we have the color image:

Next, we have the in camera processed image:

Then, a black & white converted with the GIMP program:

And lastly, one converted with Darktable:
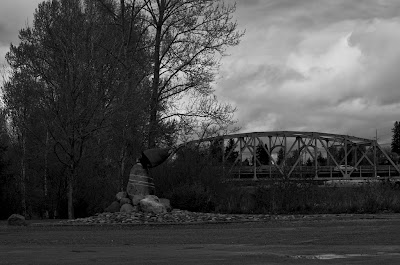
When it comes to the final product, I think you get much better results with the software conversion and that is what I recommend. As a side bonus of having a better finished image and full control over the look, you also still retain your color photograph, giving you the best of both worlds.
Blessings,
Jesse
Monday, April 15, 2013
Long Exposure of Tulips at Night
I had some free time and had been wanting to explore some long exposure night photography for a while now. And after taking the shots I had been mulling over in my head for a while, I came across a weekly challenge post on Digital Photography School - a photo site I will occasionally frequent.
The weekly challenge was titled "Seasonal" and being on the long exposure train of thought at the time - I thought it could make an interesting photo to do a long exposure of some tulips. This would fit into the topic and made for an easy shot to get with out wandering too far in the cold night that was approaching midnight (though closer to 11:00 still).
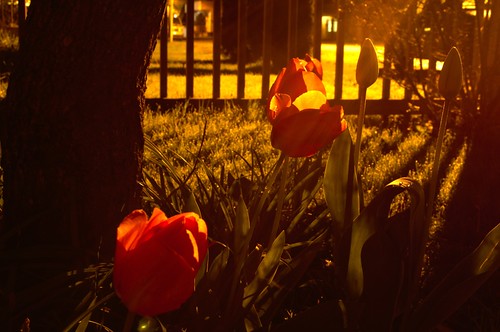
It was a fun shot to take, and one I am sure not many people do. The glow from the nearby street light and the resulting colors sure presents a look you wouldn't normally see when dealing with photographs of flowers. A selection of the other night photos I took that evening will be following in a post to come, stay tuned.
Blessings,
Jesse
The weekly challenge was titled "Seasonal" and being on the long exposure train of thought at the time - I thought it could make an interesting photo to do a long exposure of some tulips. This would fit into the topic and made for an easy shot to get with out wandering too far in the cold night that was approaching midnight (though closer to 11:00 still).
It was a fun shot to take, and one I am sure not many people do. The glow from the nearby street light and the resulting colors sure presents a look you wouldn't normally see when dealing with photographs of flowers. A selection of the other night photos I took that evening will be following in a post to come, stay tuned.
Blessings,
Jesse
Subscribe to:
Comments (Atom)